So you’re craving something tasty, kinda healthy, but your energy levels are currently residing somewhere near “sloth on vacation”? And let’s be real, you’re not trying to become a Michelin-starred chef tonight. My friend, you’ve come to the right place. Get ready for a treat that’s so easy, it practically makes itself.
Why This Recipe is Awesome
Okay, let’s be blunt: this isn’t gourmet, it’s *genius*. Why? Because it delivers maximum deliciousness for minimum effort. We’re talking three ingredients, maybe four if you’re feeling fancy, and zero cooking skills required. Seriously, if you can peel a banana and open a yogurt container, you’re basically a culinary wizard in the making. Plus, it’s guilt-free enough to eat for breakfast, dessert, or a “I need something sweet NOW” emergency. It’s idiot-proof, even I didn’t mess it up, and that’s saying something.
Ingredients You’ll Need
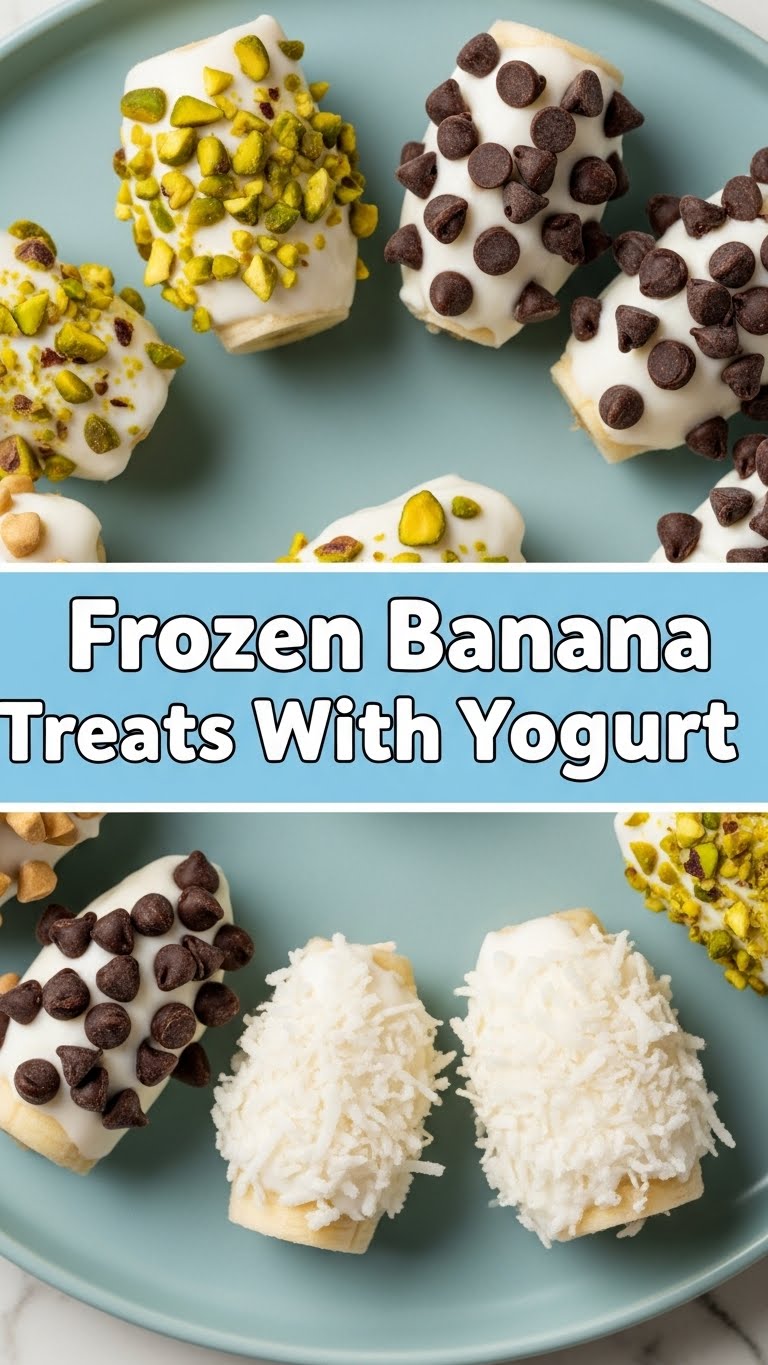
- Bananas: The riper, the better for sweetness! Think “starting to get spots”, not “green as a goblin”. How many? Depends on your snack attack level, but 2-3 usually does the trick for a good batch.
- Yogurt: Plain Greek yogurt is my go-to for that creamy tang and protein punch. But honestly, any thick yogurt works. Vanilla, strawberry, even chocolate if you’re feeling wild. Just don’t pick the super watery stuff, or things might get messy.
- Toppings (Optional, but highly recommended): Because what’s life without a little razzle-dazzle? Think sprinkles, mini chocolate chips, chopped nuts, granola, or a drizzle of honey/maple syrup. Your imagination is the limit, or your pantry, whichever runs out first.
- Popsicle sticks or skewers: Unless you’re into eating frozen bananas with your hands like a caveman. No judgment, just less sticky with a stick.
Step-by-Step Instructions
- Prep Your Bananas: Peel those glorious yellow fruits. Now, slice each banana into thick coins, about half an inch. Or cut them in half lengthwise if you want more of a “banana pop” vibe. Whichever way you slice it, literally, works!
- Get Dippy: Grab your yogurt. If you’re using a thicker yogurt, you might need to give it a quick stir. Dip each banana slice (or half) into the yogurt, making sure it’s fully coated. Don’t be shy!
- Stick ’em Up (Optional): If you’re using sticks, gently insert one into each yogurt-coated banana piece. It makes them super easy to handle later, trust me.
- Tray Time: Line a baking sheet or a plate with parchment paper. This is crucial unless you want your frozen treats to become one giant, unmovable banana blob. Arrange your dipped bananas in a single layer on the parchment paper.
- Freeze ’em Solid: Pop the tray into the freezer. Let them chill out for at least 2-3 hours, or until they’re nice and firm. Overnight is even better if you can wait that long (I usually can’t).
- Top It Off (Post-Freeze): Once solid, if you want to add toppings, now’s the time! A quick drizzle of melted chocolate, a sprinkle of nuts, or a roll in some granola. Work fast before they start to melt!
- Serve & Enjoy: Pull ’em out and devour! These are best eaten straight from the freezer. Stored in an airtight container, they’ll last a couple of weeks, but let’s be real, they won’t.
Common Mistakes to Avoid
- Using Mushy Bananas: Overripe is good, but mushy is a no-go. They’ll just fall apart in the yogurt. You want ripe, but still firm, bananas.
- Skipping the Parchment Paper: Rookie mistake! Your treats will glue themselves to the tray, and you’ll end up with a sad, scraped-off mess. Parchment paper is your best friend here.
- Thin Yogurt Woes: Using watery yogurt results in a thin, barely-there coating that won’t stick well. Go for thick and creamy, IMO, Greek yogurt is superior for this.
- Not Freezing Long Enough: Impatience leads to soft, drippy banana pops. Give them the full chill time. Good things come to those who wait!
Alternatives & Substitutions
Feeling adventurous? Or just ran out of something? No worries, we can totally improvise!
- Yogurt Swaps: Not a Greek yogurt fan? Try regular plain yogurt (just make sure it’s thick!), coconut yogurt for a dairy-free option, or even a flavored yogurt if you want to skip extra toppings. Strawberry yogurt and dark chocolate chips? Yes, please!
- Topping Extravaganza: The world is your oyster! Crushed graham crackers, shredded coconut, a dust of cinnamon, instant coffee powder mixed into the yogurt for a mocha vibe… get creative! For a healthier kick, try chia seeds or flax seeds.
- Chocolate Dip: Instead of just sprinkles, why not melt some chocolate (dark, milk, or white!) and fully dip the frozen banana pieces? Let them set again on parchment paper in the freezer for a few minutes. Pure bliss, FYI.
FAQ (Frequently Asked Questions)
- Can I use green bananas? Well, you *could*, but why would you want to? They won’t be as sweet, and the texture will be a bit starchier. Stick to ripe ones for maximum flavor.
- Do I really need the popsicle sticks? “Need” is a strong word, but they make eating these so much cleaner and more fun! Unless you enjoy sticky fingers, I’d say yes, grab some.
- How long do they last in the freezer? Stored in an airtight container, they’re good for about 2 weeks. But let’s be real, they’ll be gone way before then. Mine never make it past 3 days.
- Can I use frozen banana slices instead of fresh? You absolutely can! Just make sure they are completely defrosted first, then proceed with the recipe as usual. Dipping frozen bananas into yogurt wouldn’t work well.
- What if my yogurt is too thin? Oh no! You can try straining it through a coffee filter or cheesecloth for a few hours in the fridge to thicken it up, or just use it and accept a thinner coating. Live and learn!
- Are these actually healthy? Compared to a store-bought ice cream bar? Absolutely! It’s fruit and yogurt, packed with nutrients. Add some nuts for healthy fats or chia for fiber. It’s a win-win, really.
Final Thoughts
So there you have it, folks! Your new favorite, super-duper-easy, surprisingly healthy, and utterly delicious frozen banana treat recipe. You’ve officially conquered a snack that’s perfect for hot days, late-night cravings, or just because Tuesdays exist. Now go impress someone—or yourself—with your new culinary “skills”. You’ve earned it!


