So you’re craving something tasty but too lazy to spend forever in the kitchen, huh? Same. We’ve all been there: that moment when your sweet tooth screams for attention, but your energy levels are, let’s just say, “economical.” Well, buckle up, buttercup, because I’m about to drop some serious knowledge on how to achieve peak dessert bliss with minimal effort. We’re talking about making Ice Cream Sandwiches with Cookies, and trust me, it’s so easy, you’ll wonder why you ever bought them pre-made.
Why This Recipe is Awesome
Let’s be real, most recipes involve a laundry list of ingredients, obscure techniques, and enough dishes to fill your sink for a week. Not this one, my friend. This gem is practically idiot-proof—even I didn’t mess it up, and that’s saying something. It’s quick, customizable, and delivers instant gratification without the drama. Think of it as the ultimate flex: you made dessert, it looks impressive, and your kitchen isn’t a war zone. Plus, it’s a great way to use up those rogue cookies you baked last week or, let’s be honest, that tub of ice cream that’s been whispering your name from the freezer.
Ingredients You’ll Need
Alright, gather your troops! This list is gloriously short, which means less time at the grocery store and more time chilling (pun intended).
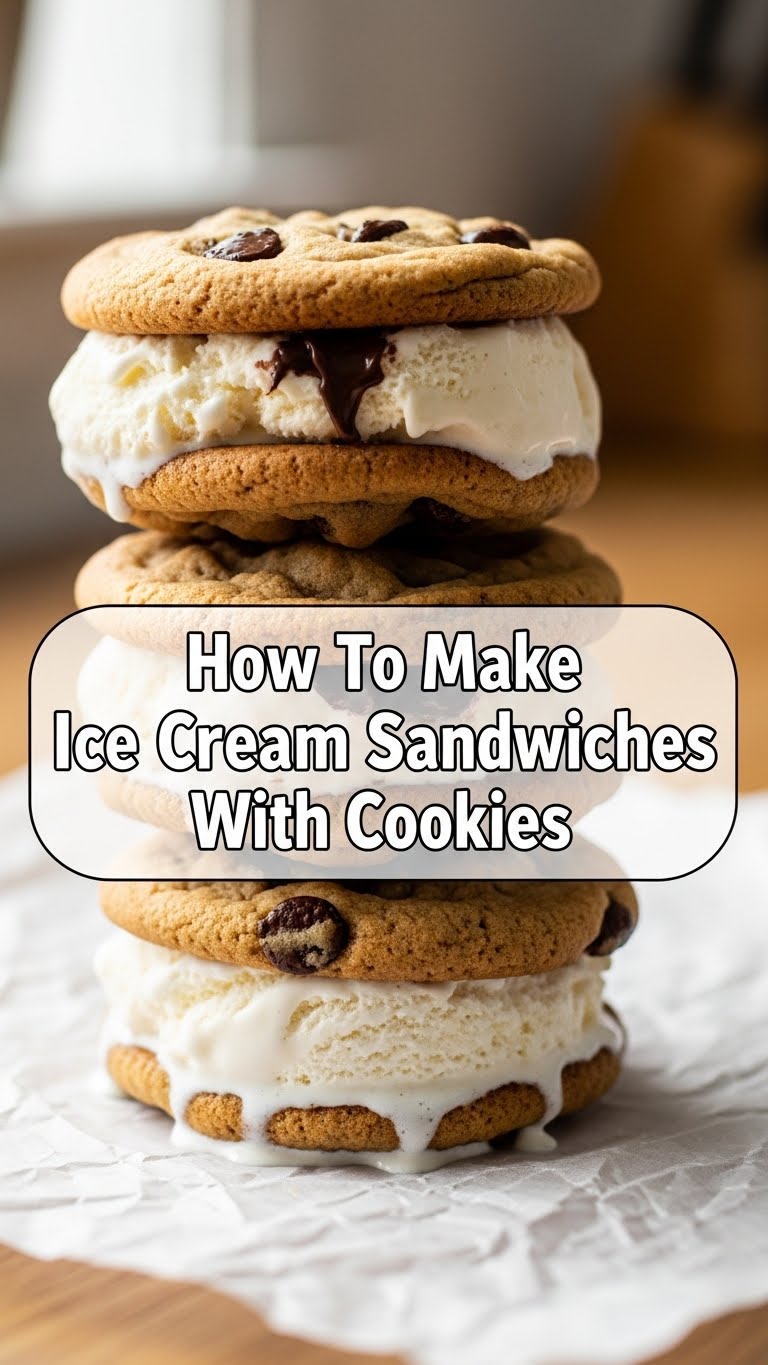
- Cookies: Your absolute favorite kind! Chocolate chip, oatmeal, snickerdoodle, even those fancy shortbread ones. Store-bought is NOT cheating; it’s strategic. If you’re feeling ambitious and bake your own, go you! Just make sure they’re completely cooled.
- Ice Cream: Any flavor that makes your heart sing (or stomach rumble). Vanilla, chocolate, mint chip, strawberry swirl – the world is your oyster! Just pick something that pairs well with your cookies, IMO.
- Optional Fun Stuff (because why stop at perfect?):
- Sprinkles: Rainbow, chocolate, seasonal – go wild!
- Mini Chocolate Chips: For that extra chocolatey crunch.
- Crushed Nuts: Peanuts, pecans, walnuts – for the sophisticated palate.
- Shredded Coconut: Tropical vibes, anyone?
Step-by-Step Instructions
This is where the magic happens. Prepare to be amazed by your own culinary prowess.
- Soften the Ice Cream (Slightly): Take your ice cream out of the freezer about 5-10 minutes before you start. You want it pliable enough to scoop and spread without a wrestling match, but not a melted puddle. **This is key for easy assembly!**
- Cookie Prep: Lay out half of your cookies on a baking sheet lined with parchment paper. This makes cleanup a breeze and prevents sticking later.
- Scoop & Spread: Take a generous scoop of your slightly softened ice cream and place it on the flat side of one cookie. Use the back of a spoon, an offset spatula, or even a butter knife to gently spread the ice cream evenly to the edges. Don’t go overboard; remember, we’re building sandwiches, not ice cream mountains (unless that’s your vibe, no judgment).
- Top It Off: Gently place another cookie on top of the ice cream, pressing down very lightly until the ice cream spreads nicely to the edges. You want it to look like a perfectly squished sandwich, not like it just survived an earthquake.
- Optional: Roll in Toppings: If you’re using sprinkles, mini chips, or nuts, now’s the time! Gently roll the sides of your newly formed ice cream sandwich through your chosen topping. It’s messy but totally worth it.
- Freeze & Firm Up: Place your beautiful creations back on the parchment-lined baking sheet and pop them into the freezer for at least 30 minutes, or until the ice cream is nice and firm. **This step is non-negotiable!** Trying to eat them too soon will result in a glorious, sticky mess.
- Enjoy! Once firm, grab one and dig in! You’ve earned it.
Common Mistakes to Avoid
Nobody’s perfect, but we can avoid some common pitfalls with a little foresight (and humor).
- Rock-Hard Ice Cream: Trying to scoop ice cream straight from the arctic tundra of your freezer is a rookie mistake. You’ll bend your spoon, curse a lot, and probably end up with more ice cream on your counter than on your cookie. See step 1!
- Too Soft Ice Cream: On the flip side, letting your ice cream turn into a sad, melty puddle before assembly is a recipe for disaster. It’ll ooze, it’ll make your cookies soggy, and your sandwich will collapse faster than a house of cards. Timing is everything, people!
- Over-Filling: Thinking more is always better. It’s not, friend. Too much ice cream means it’ll squish out everywhere, leaving you with sticky hands and a feeling of mild regret. Aim for a nice, even layer.
- Impatience: Eating them immediately. We know the urge is strong, but **RESIST!** A little chill time in the freezer makes all the difference for a perfectly firm and enjoyable sandwich.
Alternatives & Substitutions
Feeling creative? This recipe is super flexible! Here are some ideas to mix things up:
- Cookie Power-Up: Instead of classic chocolate chip, try snickerdoodles with vanilla ice cream, peanut butter cookies with chocolate ice cream, or even brownie cookies for extra decadence. FYI, two different cookie types (e.g., one chocolate chip, one oatmeal) can create a fun, multi-texture experience!
- Ice Cream Adventure: Don’t limit yourself to basic flavors. How about coffee ice cream with chocolate cookies? Or lemon sorbet with shortbread for a lighter, zippier treat? The possibilities are endless!
- Coating Frenzy: Beyond sprinkles, think crushed Oreos, chopped candy bars (like Reese’s or Heath bars), or even a drizzle of melted chocolate that hardens in the freezer.
- Shape Shifters: If your cookies are big, you might want to use a round cookie cutter a size smaller than your cookie to cut out perfect ice cream circles for a super neat look. Or, just embrace the rustic, slightly messy charm!
FAQ (Frequently Asked Questions)
Got questions? I’ve got (casual) answers!
- Can I make these ahead of time? Absolutely! They’re actually best after a good freeze to ensure everything is solid. Make a big batch and store them individually wrapped in the freezer.
- What if my cookies break when I press them? Happens to the best of us! Just gently piece them together. It’s called “rustic charm,” not “broken.” Or, if it’s too far gone, just eat the broken bits. Quality control, right?
- How long do they last in the freezer? If properly wrapped (to prevent freezer burn), they can last a week or two. But honestly, good luck making them last that long!
- Can I use low-fat ice cream? Well, technically yes, but why hurt your soul like that? If you’re going for an ice cream sandwich, go all in, I say! 😉
- Do I need special equipment? Nah, just a spoon, a knife (for spreading), and your two hands. A cookie scoop helps with portioning ice cream, but it’s not mandatory.
- My ice cream is too hard/soft, what gives? You probably missed the “soften slightly” or “freeze to firm up” steps. It’s all about finding that sweet spot of firmness. Practice makes perfect!
Final Thoughts
And there you have it! You’ve officially graduated from dessert-craver to dessert-creator. You’re basically a culinary wizard now, wielding cookies and ice cream with masterful skill. These homemade ice cream sandwiches are perfect for parties, a cozy night in, or just whenever that craving hits and you want something gloriously satisfying without all the fuss. Now go impress someone—or yourself—with your new culinary skills. You’ve earned it!


