So you’re craving something ridiculously tasty but also kinda want to pretend you’re doing a mad scientist experiment in your kitchen, all without breaking a sweat? Same, friend. Same. Forget those bulky ice cream makers that live in the back of your pantry. We’re going old-school, new-school, no-school, whatever-school-gets-you-ice-cream-fast! Get ready to whip up some creamy, dreamy goodness with just a few ingredients and, wait for it… a bag. Yeah, a bag!
Why This Recipe is Awesome
Okay, let’s be real, you’re not here for a complex culinary journey. You’re here because you want delicious ice cream, like, yesterday, and with minimal fuss. And guess what? This recipe delivers! It’s practically **idiot-proof** (even I didn’t mess it up, and I once set off a smoke alarm making toast). Here’s why it’s about to become your new favorite party trick, lazy-day treat, or midnight snack:
- **No special equipment required.** Seriously, if you have two plastic bags and a freezer, you’re 90% there.
- It’s ridiculously fast. We’re talking 10-15 minutes from “I want ice cream” to “I AM EATING ICE CREAM.”
- **Kid-friendly.** Got little humans? They’ll love shaking this up. No little humans? You’ll still love shaking this up. It’s like a workout that ends in dessert!
- Minimal cleanup. Just toss the bags when you’re done. Boom.
- It’s basically science you can eat. You’re manipulating freezing points and stuff. **You’re basically a kitchen wizard.**
Ingredients You’ll Need
Gather ’round, my sweet-toothed companions! Here’s your simple shopping list. Pro tip: Don’t skimp on the whole milk if you want that creamy texture. Unless you’re into watery sadness, then by all means, live your truth. (But don’t.)
- 1 cup whole milk: Go full fat or go home. Or, you know, go slightly less creamy. Your choice!
- 2 tablespoons granulated sugar: The sweet stuff. Feel free to adjust to your sweet tooth’s demands.
- ½ teaspoon vanilla extract: The OG ice cream flavor enhancer. Don’t skip it, unless you want bland ice.
- About 3-4 cups of ice: Lots of it. Like, enough to make your freezer nervous.
- ½ cup rock salt (or coarse sea salt): This is the secret sauce! It makes the ice super-duper cold. Don’t use table salt, it won’t work as effectively.
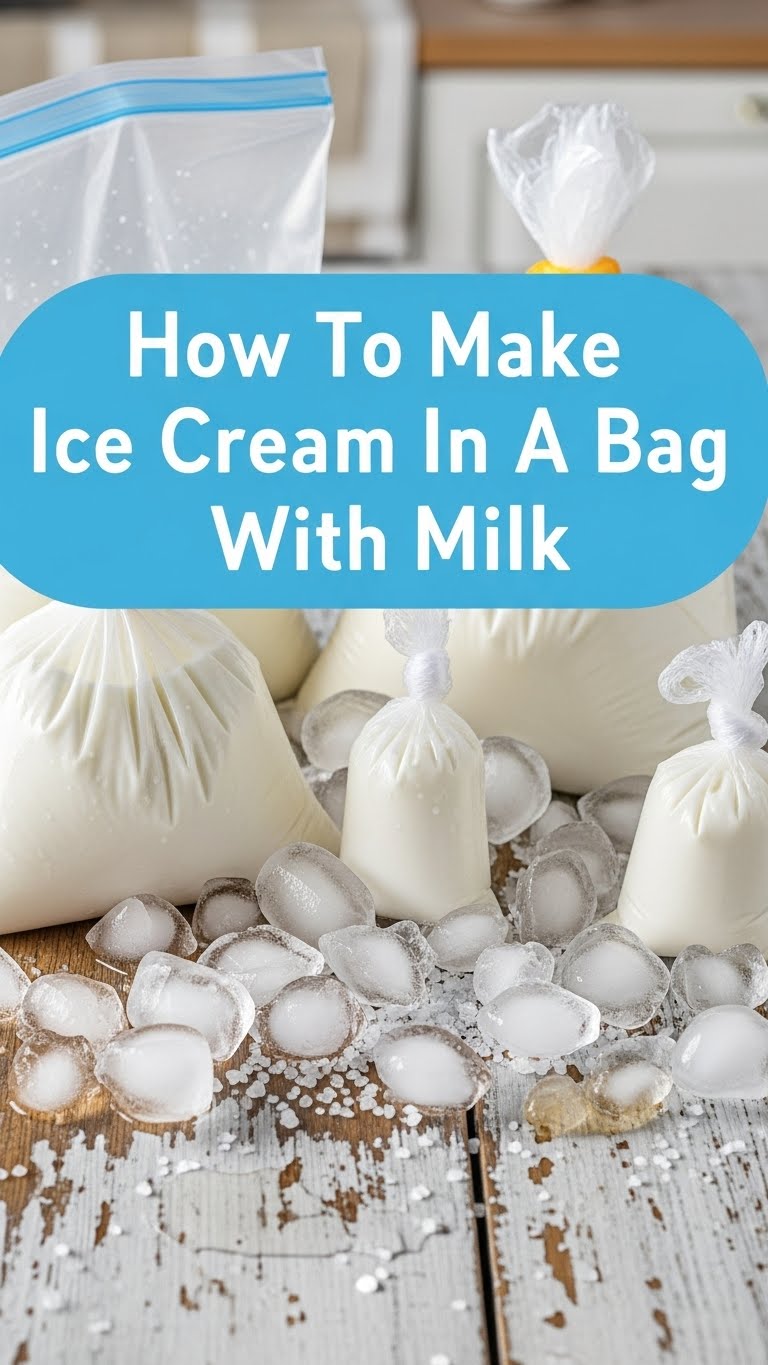
- 1 pint-sized Ziploc bag: For your ice cream mixture.
- 1 gallon-sized Ziploc bag: For the ice and salt party.
- A kitchen towel or oven mitts: Your hands will thank you later for protecting them from the chilly embrace of science.
Step-by-Step Instructions
Alright, chef, time to put on your invisible apron and get shaking! These steps are so simple, you could probably do them blindfolded (though I don’t recommend it, **FYI**).
- Mix the Magic Base: Grab your pint-sized Ziploc bag. Pour in the whole milk, sugar, and vanilla extract. Seriously, that’s it. Swish it around a bit to dissolve the sugar.
- **Seal It Tight (Like, REALLY Tight):** Squeeze out as much air as you can from the bag before sealing it. **This is crucial!** You don’t want a milky explosion in your ice bath. Double-check that seal!
- Prepare the Cold Chamber: Now, for the big kahuna—the gallon-sized Ziploc bag. Fill it about halfway with ice. Then, sprinkle that glorious rock salt all over the ice. This is where the magic happens, folks.
- Bag-ception! Carefully place your sealed pint-sized bag (with the milk mixture) into the gallon-sized bag, nestled amongst the ice and salt.
- Seal the Big Bag: Again, squeeze out air and seal that gallon bag securely. Make sure both bags are sealed like your life depends on it (or at least, like your delicious ice cream depends on it).
- **Shake, Shake, Shake!** Now for the fun part! Grab that big bag (maybe wrap it in a towel or use those oven mitts to protect your hands, **it gets COLD!**) and shake, rattle, and roll it vigorously for 5-10 minutes. Keep those hands moving! You’re basically churning ice cream without a machine. Feel free to put on some tunes and dance while you shake.
- **Check for Creaminess:** After about 5 minutes, open the large bag and peek at your small bag. Is it thickening up? Is it starting to resemble actual ice cream? If not, reseal and keep shaking! You’re looking for a thick, soft-serve consistency.
- **Rinse and Devour:** Once it’s perfect, pull the small bag out of the ice bath. **Quickly rinse the outside of the small bag** under cold tap water to wash off any residual salt. Trust me, salty ice cream is an acquired taste, and probably not what you’re aiming for. Snip a corner, or just spoon it directly from the bag. Enjoy your homemade masterpiece!
Common Mistakes to Avoid
Even though this recipe is pretty foolproof, there are a few banana peels you might slip on. Don’t be that person. Learn from my potential (and sometimes actual) blunders:
- **Not sealing the bags properly:** This is the number one culprit for a kitchen disaster. Imagine salty ice water mixing with your sweet milky base. **Tragedy, I tell you.** Seal ’em tight!
- **Skipping the rock salt:** “Oh, regular salt is fine, right?” Wrong. Regular table salt doesn’t lower the freezing point of water nearly as effectively. Your ice cream will just get slushy, not firm. Rookie mistake.
- **Not shaking enough:** Patience, grasshopper. If you stop too early, you’ll just have really cold, sugary milk. Keep shaking until it’s actually ice cream. Your arms will get a tiny workout, you’re welcome.
- **Forgetting the towel/mitts:** Your hands will turn into popsicles. It’s not fun. Trust me.
- **Eating it too fast:** Brain freeze. It’s inevitable, but try to pace yourself!
Alternatives & Substitutions
Feeling adventurous? Good! This recipe is super flexible. Think of it as a canvas for your ice cream dreams:
- **Milk base:** Want it extra rich? Use half-and-half or heavy cream instead of whole milk. Feeling a bit lighter? Almond milk or oat milk work great, though they might yield a slightly less creamy texture. Still delicious, though!
- **Flavor boosters:**
- **Chocolate:** Add a tablespoon of unsweetened cocoa powder to the milk mixture, or a drizzle of chocolate syrup.
- **Fruit:** Mash up some berries or banana and mix them in. Pure genius.
- **Coffee:** A teaspoon of instant coffee powder in the milk mixture will give you a lovely coffee ice cream.
- **Mint:** A few drops of mint extract for a refreshing kick.
- **Toppings (because why not?):** Chocolate chips, sprinkles, crushed cookies, fresh fruit, a swirl of syrup… The world is your oyster! Or, you know, your ice cream bowl.
FAQ (Frequently Asked Questions)
Got questions? I probably do too! But these are the ones *you* might have, answered in my usual, slightly-sarcastic-but-helpful tone.
Q: Why do I need rock salt? Can’t I just use regular table salt?
A: Ah, the classic science question! Rock salt (or coarse sea salt) is key because it significantly lowers the freezing point of the ice, making it *way* colder than regular ice. This super-cold environment quickly freezes your milk mixture into ice cream. Regular table salt works, but not nearly as effectively or quickly. So, stick to the rock star salt!
Q: How long do I really need to shake it? My arms are tired!
A: Think of it as your dessert-earning workout! Typically, 5-10 minutes of continuous shaking should do the trick. If it’s not firming up, you might need more salt in your ice bath, or just need to keep shaking, champ.
Q: What if my ice cream isn’t freezing after 10 minutes?
A: Don’t panic! First, check your seals (are they still good?). Then, check your ice-to-salt ratio. You need a good amount of salt to make that ice extra frosty. Add more ice and salt to the large bag, ensure good contact with the inner bag, and get back to shaking. Also, make sure your milk isn’t already warm – cold milk starts faster!
Q: Can I use non-dairy milk for this recipe?
A: Absolutely! Almond milk, oat milk, soy milk – they all work. Just be aware that the texture might be slightly less creamy than with whole dairy milk due to differing fat contents. But hey, it’ll still be a delicious, chilly treat!
Q: How do I know when it’s ready?
A: When it transforms from a liquidy mess into a scoopable, soft-serve consistency. It should be firm enough to eat with a spoon without being too runny, but not rock hard either. **IMO**, it’s perfect when it’s still a bit soft and melt-in-your-mouth delicious.
Q: Can I make a bigger batch?
A: Technically, yes, but it’s often easier to make multiple small batches in separate pint-sized bags rather than one giant one. A very large bag is harder to shake uniformly and might not freeze as evenly. Stick to the individual servings for best results!
Q: Do I have to rinse the small bag?
A: **Yes, please!** Unless you’re into an unexpectedly salty finish to your sweet treat, give that bag a quick rinse under cold water to remove any rock salt residue. Your taste buds will thank you.
Final Thoughts
See? I told you it was easy! You just conquered the world of homemade ice cream, no fancy gadgets required. Now you’ve got a personal-sized serving of pure joy, created with your own two hands and a bit of enthusiastic shaking. Go ahead, pat yourself on the back, and then immediately grab a spoon. You’ve earned this. Now go impress someone—or yourself—with your new culinary (and scientific!) skills. Enjoy every last spoonful!


