Okay, so you just binged a whole season of that show, and now your brain is telling you, “Hey, a little something sweet would hit different right now.” But like, the *good* sweet. The kind that makes you close your eyes and do a happy little wiggle. You’re craving something next-level, but also, let’s be real, you’re not trying to become a pastry chef overnight, right? Same.
Why This Recipe is Awesome
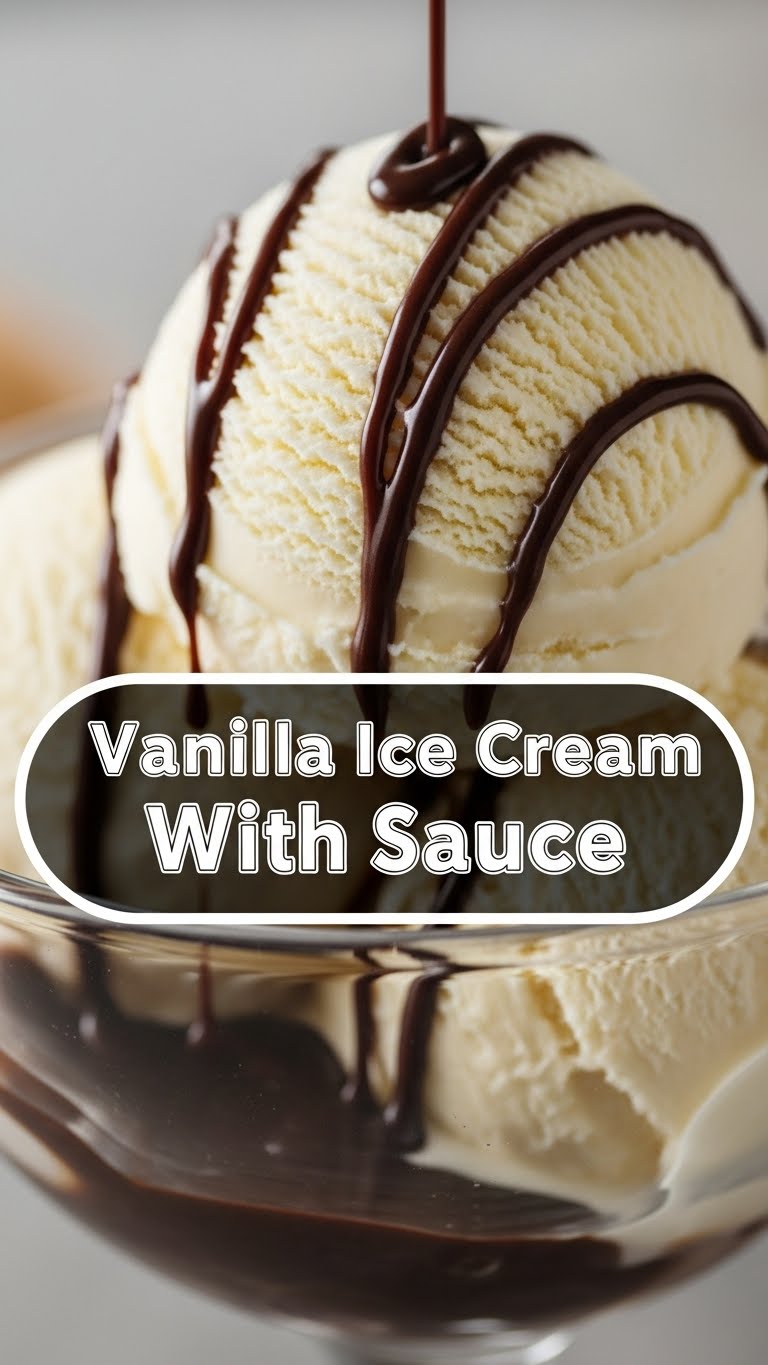
This isn’t just any vanilla ice cream. This is THE vanilla ice cream. And it comes with a ridiculously easy, sinfully rich chocolate fudge sauce because, why have one good thing when you can have two? It’s idiot-proof, honestly. If I, a person who once set off the smoke alarm making toast, can nail this, you absolutely can too. Homemade ice cream just tastes like pure joy, and it’s surprisingly simple. Plus, the bragging rights? Priceless. Your friends will think you’re some kind of culinary wizard. **FYI:** It’s also incredibly adaptable, meaning you can pimp it up with literally anything your heart desires later.
Ingredients You’ll Need
Get ready for a grocery list that won’t make your wallet cry. We’re keeping it classic, folks!
- For the Vanilla Ice Cream:
- 2 cups (about 480ml) Heavy Cream: Because life’s too short for skim, am I right? This is where the magic happens.
- 1 cup (about 240ml) Whole Milk: Helps keep things from getting *too* heavy, balances the richness.
- ¾ cup (150g) Granulated Sugar: The sweet stuff. Don’t skimp, don’t overdo. Precision, people!
- 1 tablespoon (15ml) Pure Vanilla Extract: **This is non-negotiable.** Get the good stuff. Not that imitation vanilla candle-scented nonsense. Your taste buds will thank you.
- Pinch of Salt: Just a tiny bit, it really enhances all those sweet flavors. Don’t skip it!
- For the Ridiculously Easy Chocolate Fudge Sauce:
- ½ cup (100g) Granulated Sugar: More sweetness, because we’re going all in.
- ¼ cup (25g) Unsweetened Cocoa Powder: The chocolatey goodness! Make sure it’s good quality.
- ½ cup (120ml) Milk (any kind, whole is great): To make it saucy.
- 2 tablespoons (28g) Unsalted Butter: For that glossy finish and velvety texture.
- ½ teaspoon (2.5ml) Pure Vanilla Extract: A little extra somethin’ somethin’ for the sauce.
Step-by-Step Instructions
Deep breaths! We got this. It’s easier than assembling IKEA furniture, I promise.
For the Vanilla Ice Cream:
- Whisk It Good: In a large bowl, whisk together the heavy cream, whole milk, granulated sugar, and that tiny pinch of salt until the sugar completely dissolves. This might take a couple of minutes, so put some tunes on!
- Vanilla Time: Stir in your glorious pure vanilla extract. Give it a sniff – doesn’t that smell amazing?
- Chill Out: Cover the bowl and pop it in the fridge for at least 2 hours, or even better, overnight. **This step is crucial!** A super-cold base churns into smoother ice cream. Don’t rush it, patience is a virtue here.
- Churn, Baby, Churn: Once thoroughly chilled, pour your mixture into your ice cream maker’s pre-frozen bowl. Churn according to your machine’s instructions. This usually takes about 20-30 minutes, until it’s the consistency of soft-serve.
- Harden Up: Transfer the soft ice cream to an airtight container. Press some parchment paper directly onto the surface to prevent ice crystals (trust me on this one). Freeze for another 4-6 hours, or until firm. Now try not to sneak too many spoonfuls!
For the Ridiculously Easy Chocolate Fudge Sauce:
- Saucepan Party: In a small saucepan, whisk together the sugar and cocoa powder until there are no lumps.
- Add Liquids: Gradually whisk in the milk until smooth.
- Heat It Up: Place the saucepan over medium heat and bring it to a gentle boil, stirring constantly. Let it boil for 1 minute, still stirring. It’ll thicken up a bit.
- Butter & Vanilla Bliss: Remove from heat. Stir in the butter and vanilla extract until the butter is completely melted and the sauce is smooth and glossy.
- Cool Down: Let the sauce cool down slightly before serving. It will thicken more as it cools. You can store leftovers in an airtight container in the fridge for up to a week; just gently reheat it when you’re ready for more!
Common Mistakes to Avoid
Because nobody wants a sad, icy dessert. Let’s learn from my past, slightly-less-than-stellar kitchen adventures.
- Not Chilling the Base Enough: This is probably the number one culprit for icy ice cream. If your base isn’t Arctic cold, the ice cream maker won’t be able to churn it properly. **Don’t skip the chill time!**
- Using Imitation Vanilla: Seriously, just don’t. It makes a huge difference in the final taste. Your homemade goodness deserves the real deal.
- Overfilling the Ice Cream Maker: The mixture expands as it churns. If you put too much in, it’ll overflow, making a sticky mess and potentially damaging your machine. Check your maker’s manual for its max capacity.
- Skipping the Post-Churn Freeze: Yes, it looks like soft-serve right out of the machine, and yes, it’s delicious. But if you want scoopable, firm ice cream, it needs that extra time in the freezer.
- Eyeballing the Sugar: I get it, you’re a rebel. But baking (and ice cream making) is a science. Too little sugar means icier ice cream, too much can make it overly sweet and slow the freezing. Stick to the recipe, at least for your first go!
Alternatives & Substitutions
Feeling creative? Wanna mix things up? I got you. This recipe is a great canvas!
- Dairy-Free Delight: For the ice cream, you can totally substitute the heavy cream with full-fat coconut cream and the whole milk with a dairy-free milk alternative (like almond or oat milk). Just make sure they’re full-fat for that creamy texture. The sauce can be made dairy-free too by using plant-based milk and vegan butter.
- Sweetener Swap: You *could* try other sweeteners, but granulated sugar gives the best texture and prevents iciness. If you use a liquid sweetener, you might need to adjust other liquid components. **IMO**, stick with sugar for the best results.
- Sauce It Up: Don’t like chocolate? What?! Just kidding (mostly). You could make a simple caramel sauce instead (melted sugar + cream + butter) or even a vibrant berry coulis (berries + sugar + a splash of water, simmered and strained). Heck, even store-bought hot fudge is fine if you’re truly short on time, but where’s the fun in that?
- Mix-In Magic: Once your ice cream is done churning (before the final freeze), stir in your favorite additions! Think chocolate chips, crushed cookies (Oreos, anyone?), chopped nuts, fresh berries, or even a swirl of jam.
FAQ (Frequently Asked Questions)
Got questions? I’ve probably asked them myself at some point.
Do I absolutely need an ice cream maker?
Well, for this recipe, yes, it’s designed for one. It gives you that incredibly smooth, professional texture. There are no-churn recipes out there, but they use condensed milk and different ratios. So, for *this* one, grab that machine or borrow a friend’s!
My ice cream is too hard, what gives?
Sounds like it might be over-frozen, or perhaps your freezer is set to “Antarctica.” Let it sit out on the counter for 5-10 minutes before scooping. Also, if your sugar content was a little off, it can affect the hardness.
How long does homemade ice cream last?
It’s best within a week, maybe two. After that, it starts to lose its fresh flavor and can get a bit icy. But honestly, who are we kidding? It won’t last that long anyway.
Can I use a different type of vanilla?
Vanilla bean paste or scraping a fresh vanilla bean into the mix would be divine and even more intense! Imitation vanilla? We’ve talked about this. No.
My sauce is too thick/thin. Help!
Too thick? Add a tiny splash more milk and gently reheat, stirring constantly. Too thin? Simmer it a bit longer over low heat, stirring, until it reduces and thickens to your liking. Easy fix!
Can I make a big batch for a party?
Absolutely! Just double or even triple the recipe. Make sure your ice cream maker can handle the volume, or plan to churn in batches. You’ll be the dessert hero!
Final Thoughts
There you have it, superstar! You’ve just unlocked the secret to insanely delicious, homemade vanilla ice cream with a killer chocolate fudge sauce. This isn’t just dessert; it’s an experience. Go on, treat yourself. You absolutely deserve this rich, creamy, utterly decadent bowl of happiness. Now go impress someone—or yourself—with your new culinary skills. You’ve earned it!


