So you’re craving something warm, comforting, and absolutely delicious, but the thought of peeling and slicing a gazillion apples makes you want to crawl back into bed? Been there, friend, been there. This isn’t your grandma’s “from-scratch-everything” apple pie (unless your grandma was a genius who knew how to hack a recipe). This is *our* kind of apple pie: shockingly easy, ridiculously tasty, and it uses a secret weapon that’ll make your life infinitely simpler: **canned fried apples!**
Why This Recipe is Awesome
Let’s be real, time is precious. This recipe is for the culinary adventurers who appreciate a shortcut without sacrificing flavor. Think of it as a cheat code for dessert. It’s so gloriously simple, even your pet hamster could probably follow along (if he had opposable thumbs and a tiny rolling pin). It’s **idiot-proof**, I swear. I made it, and I’m notoriously good at setting off smoke alarms. Plus, you get that classic, homey apple pie vibe without the endless prep work. Win-win, baby!
Ingredients You’ll Need
Gather your battle gear! Er, ingredients. This list is short, sweet, and to the point.
- **1 box (2 count) refrigerated pie crusts:** Look, we’re not making our own crust today. We’re busy. Embrace the convenience!
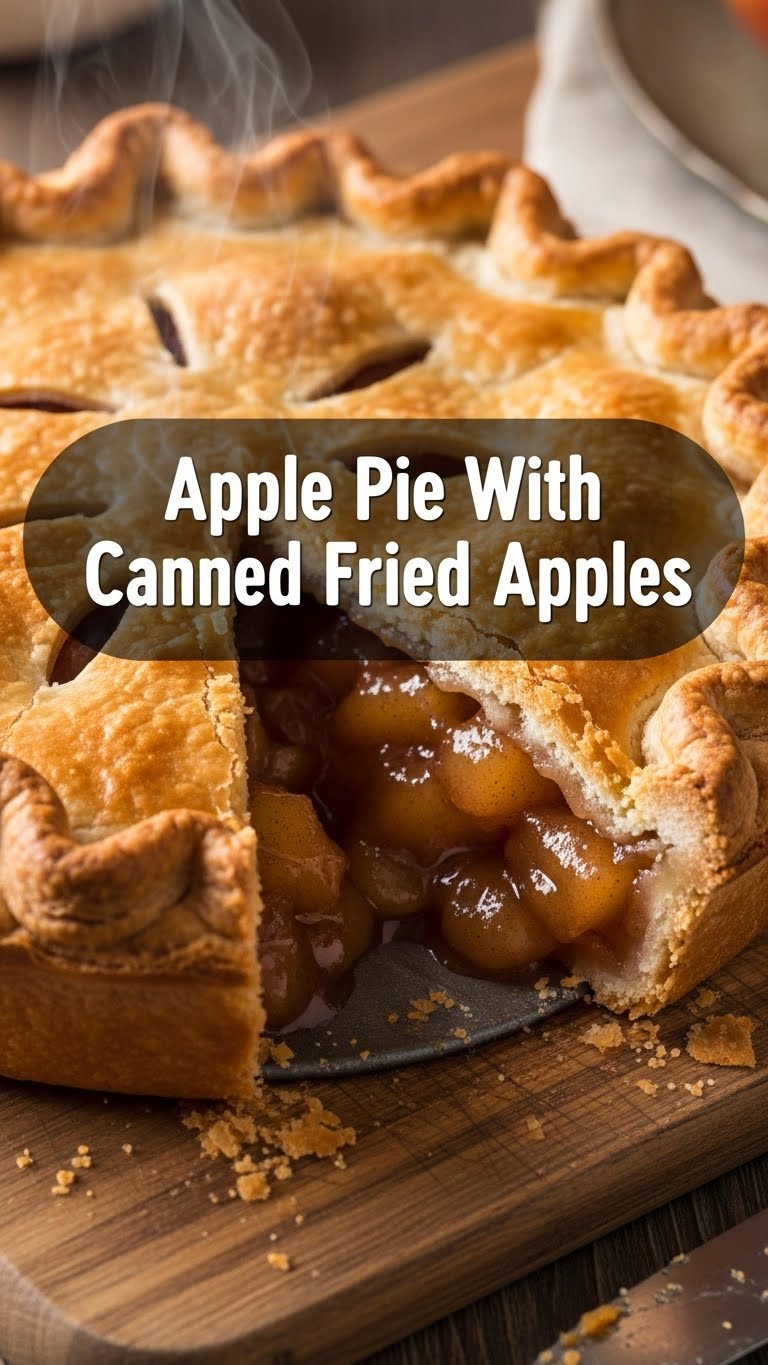
- **2 cans (20-21 oz each) canned fried apples:** The star of our show! Pre-cooked, pre-sliced, pre-everything-you-hate-doing. Bless their delicious little hearts.
- **1/4 cup granulated sugar:** Give those apples a little extra sparkle.
- **1/2 teaspoon ground cinnamon:** Because what’s apple pie without cinnamon? A sad, lonely pie, that’s what.
- **1/4 teaspoon ground nutmeg:** Just a pinch, to make things extra cozy.
- **2 tablespoons unsalted butter:** Cut into tiny little pats. Because butter makes everything better, duh.
- **1 egg yolk, mixed with 1 tablespoon water (for egg wash):** This is our secret weapon for a gorgeous, golden-brown crust. Don’t skip it!
Step-by-Step Instructions
Alright, apron on (or not, we don’t judge), let’s get baking!
- **Preheat Your Oven & Prep Your Dish:** First things first, get that oven nice and toasty to **425°F (220°C)**. Grab a 9-inch pie plate. You know, the round one.
- **Crust Me, It’s Easy:** Unroll one of your glorious pie crusts and gently fit it into your pie plate. Press it down so it’s snug, trim any major overhang, but leave a little edge.
- **Mix the Magic:** In a medium bowl, gently combine the canned fried apples (drained of any excess liquid), granulated sugar, cinnamon, and nutmeg. Give it a good stir, but don’t mush the apples. We want some texture!
- **Fill ‘Er Up:** Pour your apple mixture into the pie crust-lined plate. Distribute it evenly. Now, dot the top of the apples with those tiny pats of butter you cut. **This is where the flavor magic happens!**
- **Top It Off:** Unroll the second pie crust and carefully place it over the apple filling. You can do a fancy crimp around the edges to seal it, or just press the top crust firmly to the bottom crust. Trim any excess dough. Don’t forget to cut a few slits in the top crust—this lets the steam escape and prevents a pie explosion (which, while dramatic, is not ideal).
- **Get Golden:** Whisk that egg yolk and water together for your egg wash. Brush it all over the top of your pie crust. This will give you that beautiful, glossy, bakery-worthy finish.
- **Bake Time!** Pop that beauty into your preheated oven. Bake for **15 minutes** at 425°F. Then, **reduce the oven temperature to 375°F (190°C)** and continue baking for another **30-40 minutes**, or until the crust is a gorgeous golden brown and the filling is bubbly. If the crust starts browning too fast, you can loosely tent it with aluminum foil.
- **Cool Down, Buttercup:** Let the pie cool on a wire rack for at least 2-3 hours before slicing. I know, I know, it’s torture. But this lets the filling set properly, otherwise you’ll have a runny mess. Trust me on this one.
Common Mistakes to Avoid
Look, we all make mistakes. But let’s try to avoid these rookie blunders, shall we?
- **Not preheating the oven:** Rookie mistake! Cold oven = sad, pale crust. **Always preheat, folks.**
- **Skipping the egg wash:** Your pie won’t look as pretty. It’s like going to a fancy party in sweatpants. It works, but it’s not ideal.
- **Forgetting the butter dots:** I mean, you can, but why would you want to miss out on that extra richness? It’s a small step for man, a giant leap for pie-kind.
- **Cutting into it too soon:** I get it, the smell is intoxicating. But a warm, unset pie filling is a tragedy. Have patience, young padawan.
- **Over-handling the crusts:** Be gentle! These pre-made crusts are delicate. Treat them with respect.
Alternatives & Substitutions
Feeling a little rebellious? Here are some ways to shake things up:
- **Different Spices:** Not a nutmeg fan? Try a pinch of allspice or a tiny dash of ginger for a different kick. Or double down on the cinnamon!
- **Crust Creativity:** If you’re feeling ambitious, sure, make your own pie crust. But for this recipe, the pre-made ones are king. You could also use a crumb topping instead of a second crust for a “Dutch apple pie” vibe (just mix some flour, sugar, and butter).
- **Add-ins:** Want more texture? Throw in a handful of chopped walnuts or pecans to the apple filling. A tablespoon of dried cranberries would also be a fun, tangy twist.
- **Canned Fried Apples Substitute:** Okay, this is the core of the recipe, but if you *really* can’t find them, you could use canned apple pie filling. Just adjust the sugar and spices to taste, as it’s usually already quite sweet and spiced. **IMO**, the fried apples have a superior texture.
FAQ (Frequently Asked Questions)
Got questions? I’ve got (casual) answers!
- **Q: Can I use margarine instead of butter?**
A: Well, technically yes, but why hurt your soul like that? Butter just tastes better. It’s a fact. - **Q: My pie crust is browning too fast! What do I do?**
A: Ah, the classic race against the browning crust! Loosely tent some aluminum foil over the top. That should slow it down. - **Q: Can I add vanilla extract to the filling?**
A: Absolutely! A teaspoon of vanilla extract would add a lovely depth of flavor. Go for it! - **Q: How long does this pie last?**
A: If it even lasts a day in your house, you’re doing better than me! Realistically, 3-4 days covered at room temperature, or up to a week in the fridge. - **Q: Do I really need to drain the canned apples?**
A: Yes, please do! Otherwise, your pie filling might be too watery and won’t set up properly. We want pie, not apple soup! - **Q: Can I make this ahead of time?**
A: You can assemble the pie (without the egg wash) and chill it for a few hours before baking. Just add about 5-10 minutes to your baking time if baking from cold. **FYI**, fresh is always best, but life happens!
Final Thoughts
There you have it, folks! A delicious, easy-peasy apple pie that tastes like you slaved away for hours, but really, you just opened a couple of cans. Now go impress someone—or yourself—with your new culinary skills. Serve it warm with a scoop of vanilla ice cream or a dollop of whipped cream. You’ve earned it!


