So, you’re craving that warm, spicy hug of a pumpkin pie, but the thought of spending all day in the kitchen makes you want to curl up with a bag of chips instead, huh? Same, friend, same. But what if I told you we could whip up a show-stopping homemade pumpkin pie, complete with adorable leaf decorations (because we’re fancy, but not *too* fancy), without losing your sanity or sacrificing your Netflix binge time? You’d be intrigued, wouldn’t you? Good. Let’s do this.
Why This Recipe is Awesome
Okay, let’s be real. There are a bazillion pumpkin pie recipes out there. So, why this one? Because it’s the Goldilocks of pumpkin pies: not too sweet, not too bland, just right. Plus, it’s pretty darn **idiot-proof**. Seriously, if I can make it without setting off the smoke alarm (mostly), you can too. It uses simple ingredients you probably already have, tastes way better than anything from a can (no offense to the canned stuff, it has its moments), and the leaf decorations? They make it look like you put in *way* more effort than you actually did. It’s basically culinary camouflage. You’re welcome.
Ingredients You’ll Need
Gather ’round, my fellow kitchen adventurers! Here’s your loot list:
- For the Crust:
- 1 pre-made pie crust (store-bought is totally fine, don’t let anyone tell you otherwise. We’re about efficiency here!)
- For the Filling:
- 1 (15-ounce) can pure pumpkin puree (NOT pumpkin pie filling, unless you want an extra-sweet surprise!)
- 1 (12-ounce) can evaporated milk (the secret to super creamy pie!)
- 2 large eggs, lightly beaten (they’re the glue that holds this deliciousness together)
- ¾ cup granulated sugar (just enough sweetness to make you smile)
- ½ teaspoon salt (don’t skip this, it balances everything out)
- 1 teaspoon ground cinnamon (the star spice!)
- ½ teaspoon ground ginger (adds that warm kick)
- ¼ teaspoon ground cloves (a little goes a long way, trust me)
- Optional: pinch of freshly grated nutmeg (because fresh is always better, IMO)
- For the Leaf Decorations:
- A second pre-made pie crust (or use the scraps from your first, if you’re a super baker!)
- Small leaf-shaped cookie cutters (the cuter, the better!)
- 1 egg, whisked with a splash of water (for an egg wash – makes ’em shiny!)
- A tiny bit of extra sugar or cinnamon sugar (for sparkle, because why not?)
Step-by-Step Instructions
- **Get Prepped:** First things first, preheat your oven to 425°F (220°C). This is a crucial step, don’t be a rookie and skip it!
- **Crust Situation:** Gently unroll your first pre-made pie crust into a 9-inch pie plate. Crimp the edges however you like – fancy, rustic, or just squished with a fork. Whatever works!
- **Mix Master:** In a large bowl, whisk together the pumpkin puree, evaporated milk, beaten eggs, sugar, salt, cinnamon, ginger, and cloves (and nutmeg, if you’re feeling fancy). Whisk until everything is beautifully combined and super smooth.
- **Fill ‘Er Up:** Pour your glorious pumpkin mixture into the prepared pie crust. Don’t overfill it, leave a little room at the top.
- **Bake Time – Part 1:** Pop the pie into your preheated oven. Bake for 15 minutes at 425°F (220°C). This high heat helps set the crust.
- **Lower the Heat, Continue Baking:** After 15 minutes, **reduce the oven temperature to 350°F (175°C)** without opening the oven door. Continue baking for another 35-45 minutes, or until a knife inserted near the center comes out clean. The pie might jiggle slightly in the very center, but it shouldn’t be liquid.
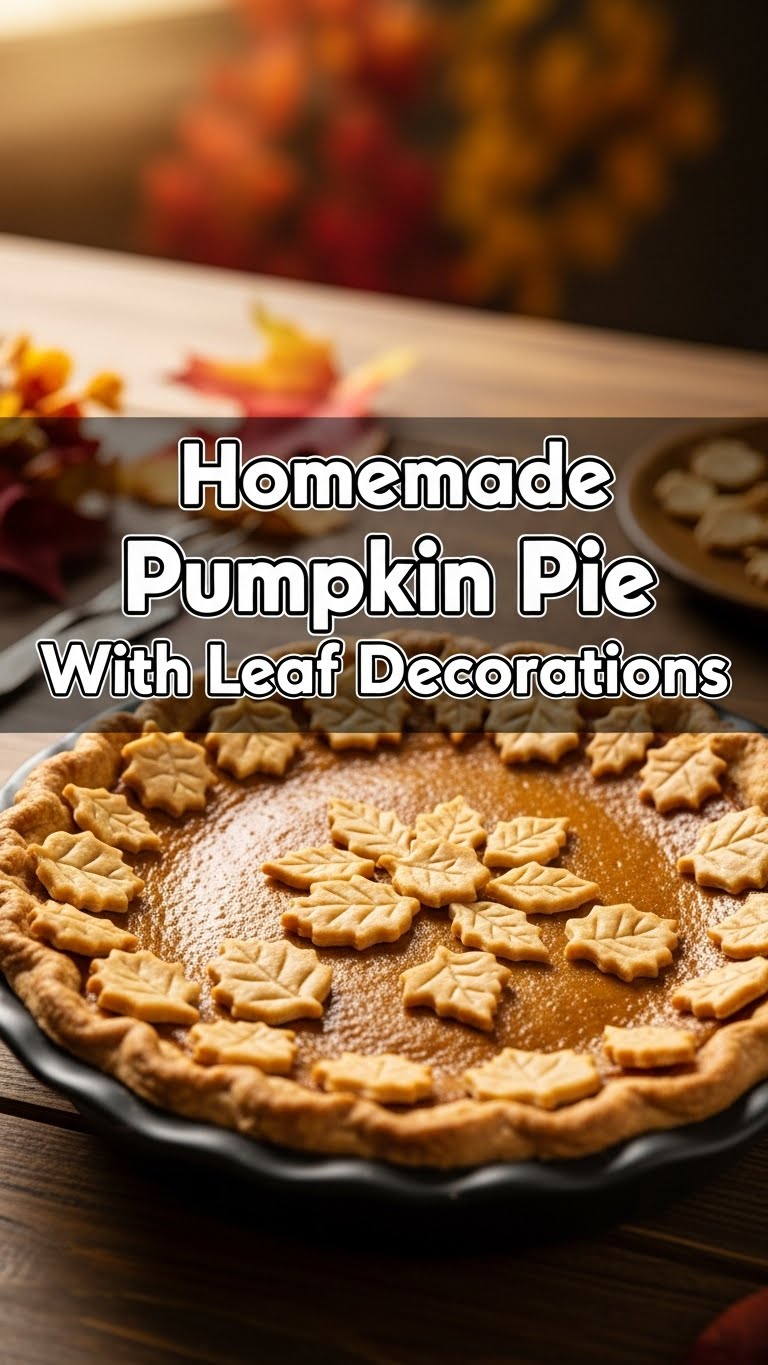
- **Leaf Fun (While the Pie Bakes):** While your pie is doing its thing, grab that second pie crust (or your scraps!). Roll it out a bit thinner if needed. Use your leaf cookie cutters to cut out a bunch of cute little leaves. Lay them on a baking sheet lined with parchment paper.
- **Egg Wash & Sparkle:** Brush your leaf cut-outs with the egg wash (egg + water) and sprinkle them lightly with sugar or cinnamon sugar. They’ll look amazing!
- **Bake the Leaves:** In the last 10-15 minutes of your pie’s baking time (or in a separate, quick bake after the pie is done), bake the leaves until they’re golden brown and slightly crispy. Keep an eye on them, they bake fast!
- **Cool Down:** Once the pie is done, carefully remove it from the oven and place it on a wire rack to cool completely. This is the hardest part – resisting the urge to cut into it immediately! It needs to cool for at least 2-3 hours to set properly.
- **Decorate & Devour:** Once the pie is cool, artfully arrange your baked pie crust leaves on top. Now, slice, serve, and bask in the glory of your homemade masterpiece!
Common Mistakes to Avoid
- **Using Pumpkin Pie Filling Instead of Pure Pumpkin Puree:** Rookie mistake! One is already spiced and sweetened; the other is just pumpkin. Reading the label is key here.
- **Not Preheating the Oven:** Seriously, it makes a difference! The initial high heat helps prevent a soggy bottom crust, which is nobody’s friend.
- **Over-baking the Pie:** A cracked surface usually means it’s been in there too long. Pull it out when it has a slight jiggle in the center – it will continue to set as it cools.
- **Cutting Into It While Hot:** I know, I know, the smell is intoxicating. But warm pie = runny pie. Let it cool down, show some self-restraint!
- **Forgetting the Salt:** It might seem like a tiny amount, but salt is a flavor enhancer. Without it, your pie might taste a little… flat.
Alternatives & Substitutions
Life’s too short to stick to the rule book sometimes, right?
- **Crust Hack:** Don’t have a pre-made crust? No biggie! A homemade flaky pie crust is always an option if you’re feeling ambitious. Or, hey, a graham cracker crust works too if you want a different vibe.
- **Spice It Up (or Down):** Not a fan of cloves? Leave ’em out! Want more ginger? Go for it! This is your pie party. You can also add a pinch of allspice for an even deeper flavor profile.
- **Milk Options:** While evaporated milk is king for creaminess, you can use heavy cream or half-and-half if you’re in a pinch. It might be a *tad* less traditional, but still delicious.
- **Sweetener Swap:** If you prefer, you can substitute brown sugar for some of the granulated sugar for a deeper, more molasses-like flavor. Just make sure it’s packed tightly.
FAQ (Frequently Asked Questions)
Because you probably have questions, and I’ve got (casual) answers!
- Can I use fresh pumpkin instead of canned? You absolutely can! Just make sure it’s cooked and pureed until super smooth. It’s a bit more work, but totally doable.
- My crust is browning too fast, what gives? Ah, the dreaded over-browning! Just grab some aluminum foil and gently crimp it around the edges of your pie crust. Problem solved!
- How do I know when the pie is truly done? The knife test is your best friend! Insert a thin knife or toothpick about an inch from the edge. If it comes out clean, you’re golden. The very center might still have a slight wobble, that’s okay.
- Can I make this ahead of time? Heck yeah! Pumpkin pie is excellent for making a day or two in advance. Just cover it loosely and pop it in the fridge. It actually tastes even better the next day as the flavors meld.
- Do I really need to use two pie crusts for the leaves? Not necessarily! If your main crust has enough extra dough around the edges after crimping, you can totally use those scraps. Or, if you’re really lazy (no judgment!), skip the leaves entirely. The pie will still be delish!
Final Thoughts
So there you have it, folks! A homemade pumpkin pie that tastes incredible, looks fancy (thanks to those cute leaves!), and didn’t require you to sell your soul to the kitchen gods. You’ve just created a masterpiece, and honestly, you deserve a medal (or at least a giant slice). Now go impress someone – or just yourself – with your newfound culinary prowess. You’ve earned it! Enjoy every single, spicy, creamy bite.


