So you’re craving something tasty but too lazy to spend forever in the kitchen, huh? Same, friend, same. My sweet tooth often has grand plans my energy levels just can’t keep up with. But what if I told you there’s a dessert so ridiculously decadent, so surprisingly easy, it’s practically magic? Get ready to whip up your own batch of **Creamy Ice Cream with Dreamy Caramel Swirls** that will make you feel like a gourmet chef without, you know, actually being one.
Why This Recipe is Awesome
Seriously, this isn’t one of those intimidating recipes that requires fancy equipment or a culinary degree. If you can stir and wield a whisk (or even an electric mixer, if you’re feeling fancy), you can conquer this. It’s **idiot-proof**, and trust me, I’ve put that claim to the test more times than I care to admit. This is a no-churn recipe, which means no fiddly ice cream maker needed! Plus, the homemade caramel? **Life-changing.** It elevates the whole experience from “store-bought good” to “oh-my-gosh-did-you-make-this-from-scratch good.” It screams ‘I tried’ without actually trying that hard. Win-win, right?
Ingredients You’ll Need
Gather your weapons, I mean, ingredients! Most of these are probably chilling in your pantry already. (See what I did there?)
For the No-Churn Ice Cream Base:
- **2 cups (480ml) cold heavy cream:** This is where the magic happens. Don’t skimp; full-fat is your friend here.
- **1 can (14oz/397g) sweetened condensed milk:** The sweet, sticky glue that holds it all together.
- **1 tsp vanilla extract:** Because everything is better with a dash of vanilla.
- **Pinch of salt:** Enhances all the other flavors. Don’t skip it!
For the Speedy Homemade Caramel Sauce:
- **1 cup (200g) granulated sugar:** Our main character for the caramel.
- **1/4 cup (60ml) water:** Just to get things started.
- **1/2 cup (120ml) heavy cream:** Warmed, please! This prevents it from seizing up.
- **4 tbsp (56g) unsalted butter:** Because butter makes everything better, **IMO**.
- **1/2 tsp vanilla extract:** Another vanilla cameo!
- **1/4 tsp flaky sea salt (optional, but highly recommended!):** A touch of salty sophistication.
Step-by-Step Instructions
Alright, apron up! Or don’t, I won’t tell. Let’s make some deliciousness.
- **Caramel First (and chill!):** In a medium saucepan, combine the sugar and water. Cook over medium heat, stirring occasionally until the sugar dissolves. Once it boils, **stop stirring**! Let it bubble away until it turns a beautiful amber color. Keep a close eye on it—this happens fast!
- **Butter & Cream Time:** Once amber, immediately remove from heat. Carefully add the butter, whisking until melted. Then, slowly pour in the warm heavy cream, whisking constantly. It will bubble up like crazy, so be careful! Stir in the vanilla and salt. Let this cool completely to room temperature, then chill in the fridge until thick and lovely.
- **Whip It Real Good:** In a large bowl, using an electric mixer (or some serious arm muscle), beat the cold heavy cream until **stiff peaks form**. This means when you lift the whisk, the cream holds its shape.
- **Combine the Base:** Gently fold in the sweetened condensed milk, vanilla extract, and pinch of salt into the whipped cream. **Be gentle**, you want to keep all that glorious air in the cream.
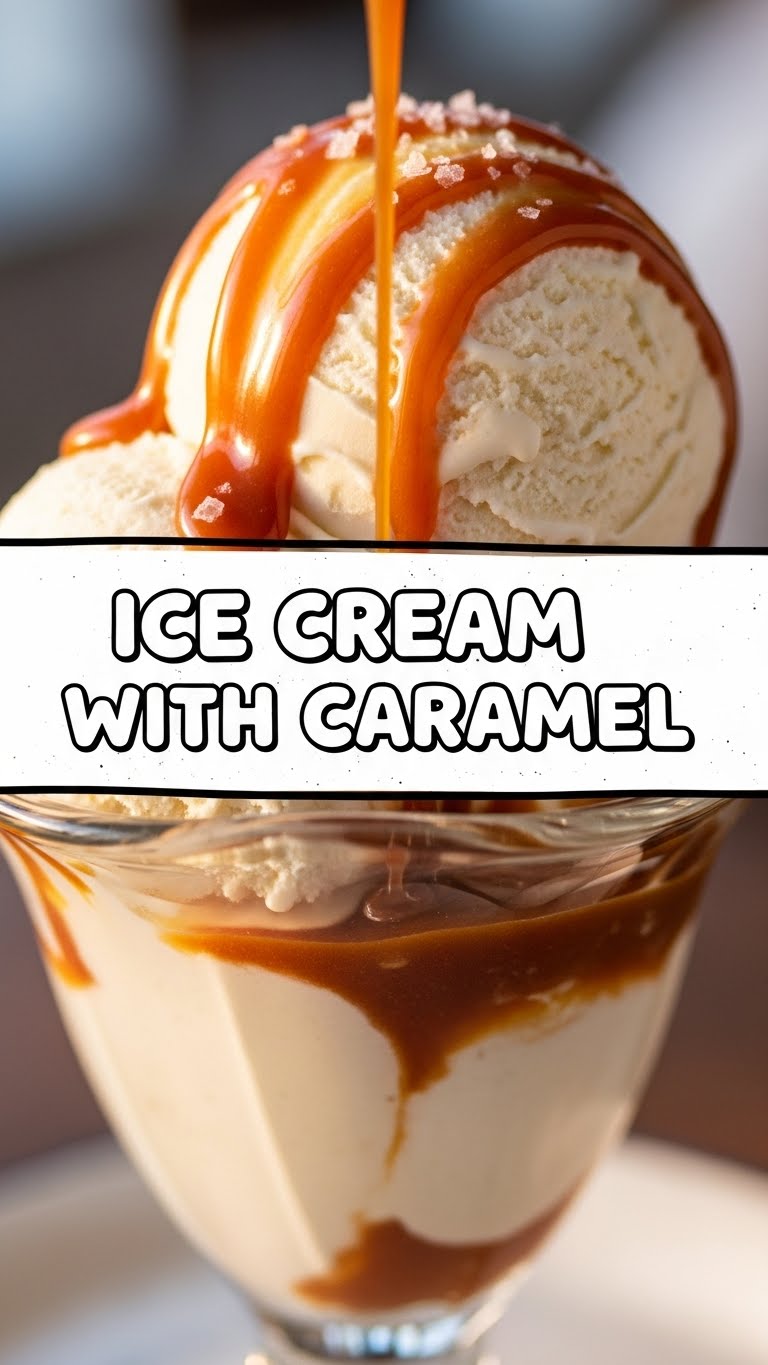
- **Layer and Swirl:** Grab a freezer-safe container (a loaf pan works perfectly!). Pour about half of the ice cream mixture into the pan. Drizzle about half of your cooled caramel sauce over it. Repeat with the remaining ice cream mixture and caramel.
- **The Swirl Factor:** Take a butter knife or skewer and gently swirl the caramel through the ice cream. Don’t overmix, we’re going for ribbons of caramel, not a uniform brown.
- **Freeze for Glory:** Cover the container with plastic wrap or a lid. Pop it into the freezer for at least **6-8 hours**, or even better, overnight. Patience is a virtue, especially when ice cream is involved.
Common Mistakes to Avoid
We all make mistakes, but with a little foresight, you can avoid these classic blunders. You’re welcome!
- **Burning the Caramel:** This is probably the trickiest part. Sugar goes from perfectly golden to burnt in seconds. **Keep a vigilant eye** and remove it from the heat as soon as it’s amber. A burnt caramel tastes bitter, and nobody wants that.
- **Not Warming Your Cream for Caramel:** When adding cold cream to hot sugar, it can seize up into a hard lump. **Always warm your cream** for the caramel sauce; it helps it incorporate smoothly.
- **Over-whipping the Heavy Cream:** If you whip the heavy cream too long, it’ll turn grainy or even into butter. Aim for **stiff peaks** – when you pull out the whisk, the peaks stand up straight.
- **Impatience:** Trying to serve it too soon is a rookie error. **Give it ample time to freeze** (at least 6-8 hours!) for that perfect scoopable texture.
- **Using Low-Fat Anything:** Trying to make this “healthier” with low-fat cream or condensed milk? **Don’t even think about it.** It won’t set properly, and the texture will be sad. This is a treat, embrace it!
Alternatives & Substitutions
Feeling creative? Or just missing an ingredient? No worries, we’ve got options!
- **Store-Bought Caramel:** If the thought of making caramel freaks you out (or you’re just *really* lazy today), go ahead and use your favorite jarred caramel sauce. **No judgment here!** Just warm it up slightly so it drizzles nicely.
- **Add-ins Galore:** Want more texture? Swirl in some chopped pecans, walnuts, chocolate chips, or even crushed pretzels for a salty-sweet crunch.
- **Different Extracts:** Swap out vanilla for almond extract, peppermint extract (for a festive twist!), or even a touch of coffee extract in your ice cream base.
- **Chocolate Drizzle:** Add another layer of decadence by drizzling some melted chocolate over the caramel swirls before freezing. BAM!
FAQ (Frequently Asked Questions)
Got questions? I’ve got (casual) answers!
- **Do I really need an ice cream maker?** Nope! That’s the beauty of this no-churn recipe. Your freezer does all the heavy lifting.
- **My caramel hardened in the fridge, help!** Totally normal! Just gently reheat it over low heat or in short bursts in the microwave, stirring until it’s pourable again.
- **How long does homemade ice cream last?** It’s best eaten within a week for optimal creaminess, but it can last up to 2-3 weeks in an airtight container in the freezer.
- **Can I use evaporated milk instead of condensed milk?** Absolutely not! Evaporated milk is unsweetened and will not give you the right texture or sweetness. **FYI**, they are very different.
- **Can I make this dairy-free?** You can find dairy-free heavy whipping cream alternatives and sweetened condensed coconut milk! The caramel would be trickier, but certainly doable with dairy-free butter and cream.
- **Why is my ice cream icy?** This usually happens if the heavy cream wasn’t whipped enough, or if the freezer isn’t cold enough. Make sure to get those **stiff peaks**!
Final Thoughts
See? You just made something truly spectacular, and your kitchen isn’t even a disaster zone (hopefully!). This homemade ice cream with caramel swirls is proof that you don’t need to be a Michelin-star chef to create pure bliss. It’s the perfect treat for a cozy night in, an impromptu gathering, or just when you need a little (or a lot of) sweetness in your life. Now go impress someone—or yourself—with your new culinary skills. You’ve earned it!


