Hey there, baking buddy! Ever scrolled through Instagram, drooling over those ridiculously cool desserts, but then immediately thought, “Yeah, no way am I spending my entire weekend on that?” Same, my friend, same. We want epic, we want impressive, but most importantly, we want *easy*. And guess what? I’ve stumbled upon the holy grail of effortless showstoppers: the glorious cake with ice cream cones perched jauntily on top. It’s basically a party in cake form, and you’re invited!
Why This Recipe is Awesome
Okay, so why should you ditch your Netflix binge for this? Because this isn’t just a cake; it’s a statement. It screams, “I’m fun, I’m creative, and yes, I absolutely deserve a second slice!” Plus, it’s pretty much **idiot-proof**. Seriously, if I can pull this off without accidentally setting off the smoke alarm (which is saying a lot, trust me), then you, my culinary champion, will be a superstar.
- **Looks Like a Million Bucks, Costs Pennies:** You’ll get all the “oohs” and “aahs” without breaking the bank or your spirit.
- **Customizable AF:** Vanilla, chocolate, rainbow sprinkles—the world is your oyster! Or, you know, your cake.
- **Kid-Friendly (or Kid-at-Heart-Friendly):** Who doesn’t love a mini ice cream cone on their cake? It’s pure joy, unadulterated.
- **Minimal Stress, Maximum Impact:** This recipe is all about working smarter, not harder.
Ingredients You’ll Need
Don’t sweat it; these are all your usual suspects, probably already chilling in your pantry or a quick grocery run away. We’re keeping it simple, because complicated is for taxes, not cake.
For the Cake (Your Favorite Recipe or a Box Mix – No Judgment!)
- 1 Box Cake Mix (any flavor you love!): Or, if you’re feeling fancy, your go-to scratch cake recipe. We’re all about flexibility here.
- Ingredients listed on your cake mix box: Usually eggs, oil, and water. Follow their lead; they know what’s up.
For the Frosting (Because Cake Needs Clothes)
- 1 cup (2 sticks) unsalted butter, softened: Let it chill out on the counter for a bit. **Softened butter is key for smooth frosting!**
- 4 cups powdered sugar: Also known as confectioners’ sugar. The finer, the better for that silky finish.
- 1/4 cup milk (or cream): Whole milk works best.
- 1-2 teaspoons vanilla extract: The soul of frosting, IMO.
- Pinch of salt: Balances out all that sweetness.
- Food coloring (optional): For extra pizzazz!
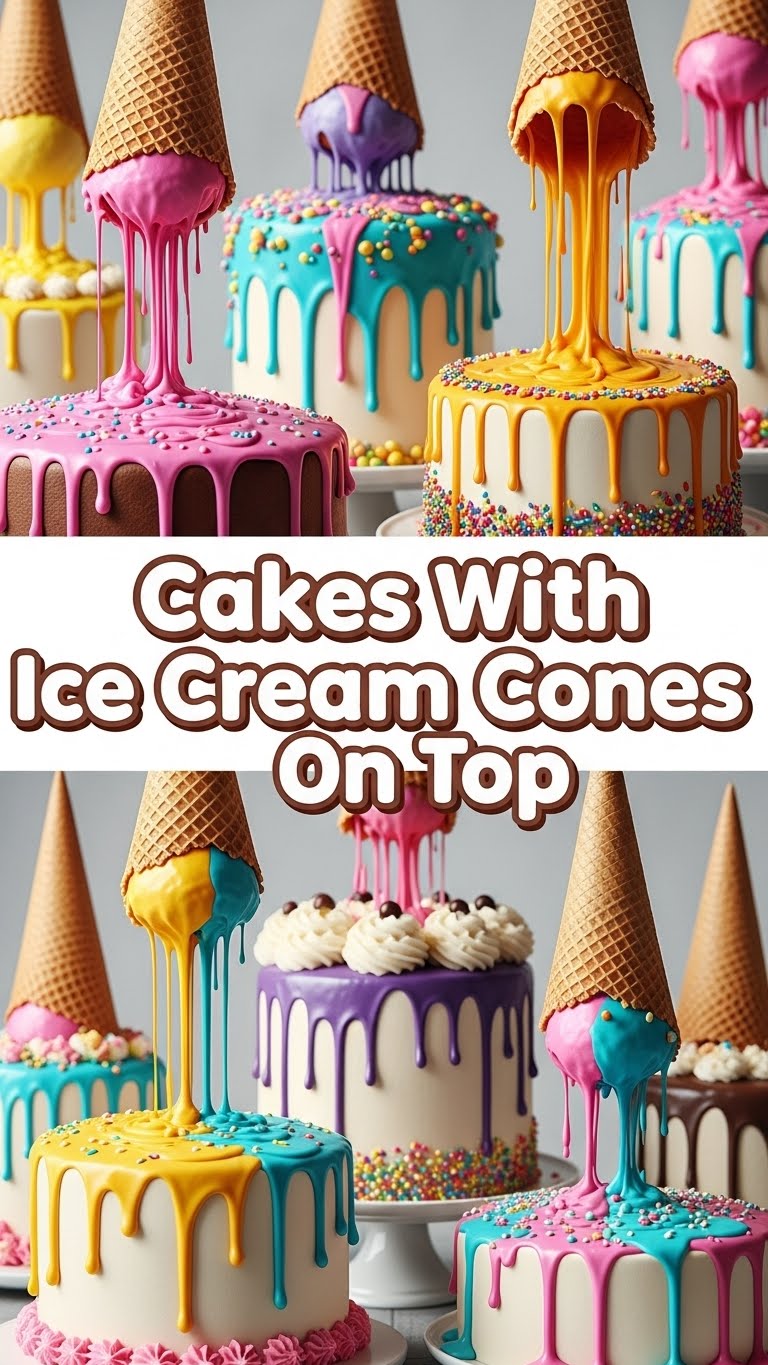
For the Cone Toppers (The Star of the Show!)
- 6-8 mini ice cream cones (or regular size, if you’re feeling extra): Sugar cones or wafer cones work great.
- Your favorite ice cream (scooped into balls and frozen solid!): Pick something fun! Chocolate, vanilla, strawberry swirl—go wild!
- Sprinkles, chocolate syrup, caramel sauce, chopped nuts (optional): For ultimate cone decoration.
Step-by-Step Instructions
Alright, let’s get this party started! Remember, deep breaths and maybe some good music. Baking should be fun!
- **Bake Your Cake Base:** Preheat your oven to the temperature specified on your cake mix box (or recipe). Prepare your chosen cake pans (greased and floured, or lined with parchment) and mix your cake batter according to instructions. Pour into pans and bake until a toothpick inserted into the center comes out clean.
- **Cool It Down:** Let your cakes cool in the pans for about 10-15 minutes before inverting them onto a wire rack to cool completely. **Do NOT try to frost a warm cake unless you enjoy a melted, sugary mess!** Seriously, patience here is a virtue.
- **Whip Up That Frosting:** While the cake cools, grab a large bowl and beat the softened butter with an electric mixer until it’s light and fluffy (about 2-3 minutes). Gradually add the powdered sugar, one cup at a time, mixing well after each addition.
- **Get it Creamy:** Pour in the milk (start with 1/4 cup) and vanilla extract. Beat on medium-high speed until the frosting is smooth and creamy. If it’s too thick, add a tiny bit more milk; too thin, add more powdered sugar. Now’s the time to add food coloring if you’re going for a vibrant look!
- **Frost Your Masterpiece:** Once your cake is completely cool, frost it! You can do a simple flat top, create swirls, or even do multiple layers if you baked more than one cake. Don’t overthink it; rustic charm is totally in.
- **Prep Those Mini Cones:** This is the fun part! While your cake is chilling post-frosting, scoop your favorite ice cream into small balls (think mini scoop size) and place them on a parchment-lined tray. Pop them back in the freezer until they are rock hard. This prevents immediate melting when you place them on the cake!
- **Decorate Your Cones:** Once the ice cream scoops are frozen solid, place one scoop into each mini cone. You can then dip the ice cream part into sprinkles, drizzle with chocolate syrup, or add any other toppings you desire. Return the cones to the freezer for a few minutes to ensure everything is super cold and set.
- **The Grand Finale:** Just before serving, take your beautiful frosted cake and your prepped ice cream cones. Gently place the mini cones on top of the cake, pressing lightly to secure them. You can arrange them however you like – in a circle, scattered, a line – get creative!
- **Serve and Shine!** Present your amazing creation to adoring fans. And make sure you grab a slice first; you earned it!
Common Mistakes to Avoid
We’ve all been there. Learning from mistakes is character building, but avoiding them is just smart. Here’s what not to do:
- **Frosting a Warm Cake:** This isn’t a warm drizzle scenario; it’s a melted disaster. **Cool that cake completely!**
- **Not Freezing the Ice Cream Scoops Solid:** You’ll end up with sad, droopy cones that melt before anyone even sees them. Think of the Instagram potential you’d lose!
- **Overmixing the Cake Batter:** Unless you’re into hockey pucks, don’t beat your cake batter to death. Mix just until combined for a light, fluffy cake.
- **Eyeballing Ingredients (Especially for Frosting):** Baking is chemistry, folks! A little too much or too little of something can throw the whole thing off. Get out those measuring cups!
- **Thinking You Don’t Need Sprinkles:** Rookie mistake. Sprinkles are non-negotiable for fun.
Alternatives & Substitutions
Feeling adventurous? Or maybe you just ran out of something? No worries, we’ve got options!
- **Cake Flavor:** Vanilla is classic, but chocolate, funfetti, red velvet, or even lemon would be amazing. Pick your poison!
- **Frosting Flavor:** Swap vanilla extract for almond extract, peppermint extract, or even a dash of espresso powder for a coffee kick. You can also melt some chocolate and mix it in for chocolate buttercream.
- **Ice Cream Choice:** Any flavor works! Just imagine a mint chip cone on a chocolate cake, or strawberry ice cream on a vanilla funfetti. Dreamy. Dairy-free ice creams also work beautifully here!
- **Cone Type:** Sugar cones are sturdy, but wafer cones are lighter. You could even use small waffle bowls if you want a bigger scoop of ice cream on top!
- **Toppings:** Beyond sprinkles, think mini chocolate chips, chopped nuts, shredded coconut, or even a drizzle of homemade caramel or hot fudge.
FAQ (Frequently Asked Questions)
Got questions? I probably do too, but I’ll pretend I have all the answers for your sake.
Can I make this ahead of time?
Oh honey, absolutely! Bake and frost the cake a day in advance, store it covered at room temperature. Prep your ice cream cones (with the frozen scoops) and keep them in the freezer. Assemble just before serving for maximum impact and minimal meltage.
What if I don’t have mini cones?
No sweat! Use regular-sized cones and adjust your ice cream scoop size. It’ll just be a bigger, bolder statement. Or, you can crush up some cones and sprinkle them on top for a deconstructed vibe.
My frosting is too thin/thick! Help!
Too thin? Add more powdered sugar, a tablespoon at a time, until it reaches desired consistency. Too thick? Add milk (or cream) a teaspoon at a time. It’s like a delicious science experiment!
Can I use oil instead of butter in the frosting?
Well, technically you *could* for some recipes, but for a classic buttercream, butter is king. It gives it that rich flavor and creamy texture you’re looking for. Why hurt your soul like that?
How do I store leftovers?
If you have any cake left (a rarity, I know), remove any remaining ice cream cones first. Cover the cake loosely and store it in the fridge. Best eaten within 2-3 days.
Is this recipe good for kids’ parties?
Is the sky blue? Yes! It’s practically *designed* for kids’ parties. It’s fun, colorful, and combines two of their favorite things: cake and ice cream! Total crowd-pleaser.
Can I use whipped cream instead of buttercream?
You can, but whipped cream is much less stable, especially at room temp. It might get a bit messy, and your cones might have trouble staying put. Buttercream is your best bet for structural integrity and impressive looks.
Final Thoughts
There you have it! A dessert that’s as fun to make as it is to eat. This cake with ice cream cones on top isn’t just a recipe; it’s an experience. It’s a guaranteed smile-maker, a conversation starter, and an absolute treat for your taste buds. So go forth, my friend, unleash your inner baking rebel, and create something truly awesome. Now go impress someone—or yourself—with your new culinary skills. You’ve earned it!


