So you’re craving something ridiculously tasty but also kinda want to lounge on the couch doing absolutely nothing, huh? Same, friend, same. What if I told you there’s a dessert that’s so easy, so minimal-effort, and so utterly delicious, it feels like cheating? A dessert involving your favorite ice cream, and even better, those nostalgic ice cream bars you sneak out of the freezer at 2 AM? Get ready, because we’re making an Ice Cream Cake that’s basically a party in a pan.
Why This Recipe is Awesome
Look, if you can open a freezer, you can make this. Seriously. This isn’t one of those recipes where you need a fancy stand mixer or a culinary degree. It’s the kind of dessert that makes people go “ooooh!” while you just casually shrug and say, “Oh, this? Just whipped it up.” It requires **zero baking**, minimal actual “cooking,” and maximum deliciousness. Plus, it’s pretty much impossible to screw up, unless you forget to put it back in the freezer. Don’t do that. It’s also incredibly versatile, meaning you can basically throw in whatever sugary goodness your heart desires. It’s truly idiot-proof, even I didn’t mess it up.
Ingredients You’ll Need
Gather your weapons, chef! Or, you know, just open your freezer and pantry.
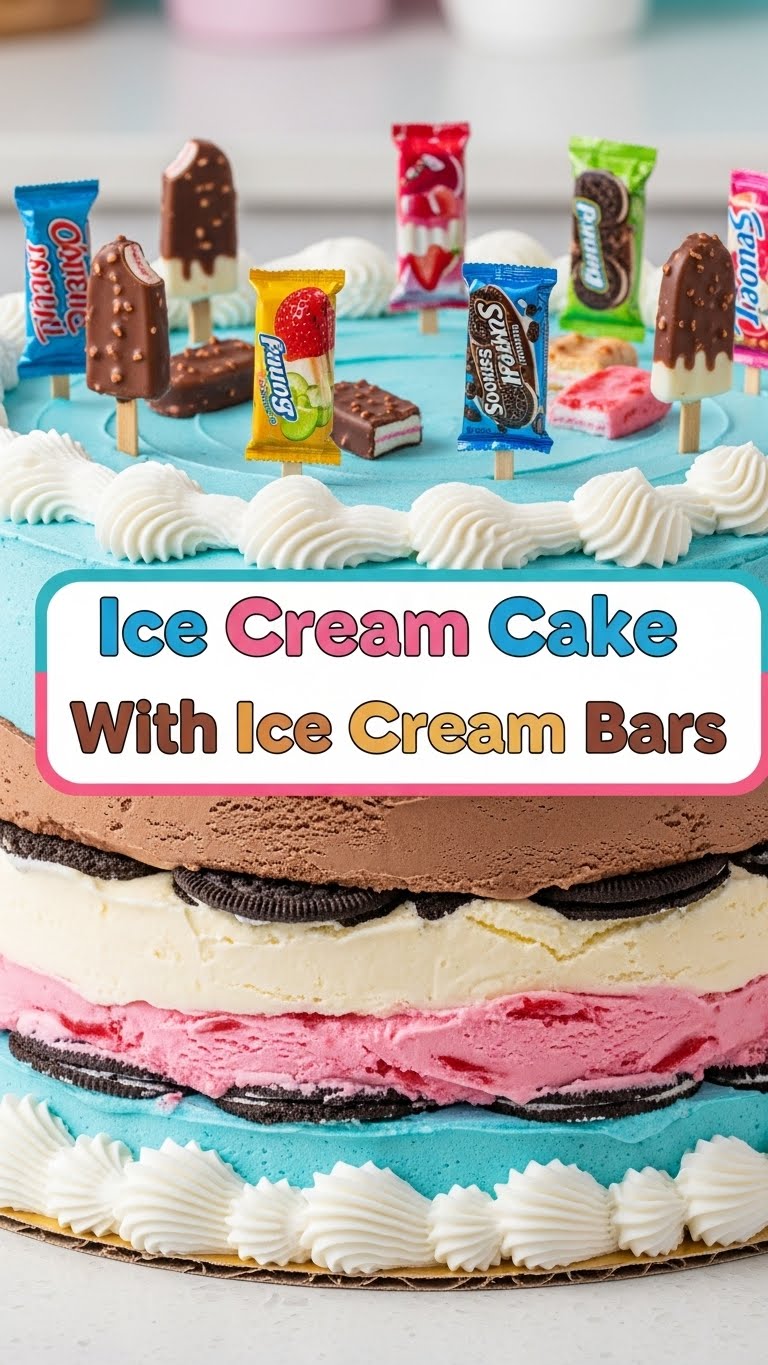
- 12-18 Ice Cream Bars: These are your building blocks. Go for classic chocolate-coated vanilla, or mix it up with some fancy ones. Your cake, your rules.
- 1 Half-Gallon (approx. 2 quarts) Ice Cream: Any flavor! Vanilla is a solid classic, chocolate is always a win, or get crazy with cookie dough or mint chip.
- 1 jar (16 oz) Hot Fudge or Caramel Sauce: Or both! We’re not judging. This adds that crucial gooey factor.
- 1 tub (8 oz) Whipped Topping: Like Cool Whip. Because everything is better with a cloud of sweetness on top, IMO.
- Your Favorite Toppings: Sprinkles, crushed Oreos, chopped nuts, mini M&Ms, gummy bears (okay, maybe not gummy bears). Let your inner child loose!
- A 9×13 inch baking dish: Or whatever similar rectangular dish you have lying around. No judgment on your mismatched bakeware collection.
Step-by-Step Instructions
- Prep Your Pan: Grab your 9×13 inch dish. For easier serving later, **line it with parchment paper or aluminum foil**, leaving an overhang on the sides. You’ll thank yourself when you pull it out.
- First Bar Layer: Unwrap half of your ice cream bars (so, 6-9 of them). Arrange them in a single layer at the bottom of your prepared dish. You might need to gently squish or cut them to fit, but don’t overthink it. It’s rustic!
- Soft-Serve Scoop: Take your half-gallon of ice cream out of the freezer and let it sit on the counter for about 10-15 minutes until it’s slightly softened but not fully melted. You want it spreadable. Spread half of this softened ice cream evenly over your layer of ice cream bars.
- Drizzle & Chill: Now for the good stuff! Drizzle about a third of your hot fudge or caramel sauce over the ice cream layer. Pop the dish back into the freezer for at least 30 minutes to firm up. This prevents everything from turning into a soupy mess.
- Second Bar Layer: Once firm, repeat step 2! Unwrap the rest of your ice cream bars and lay them over the chilled ice cream and sauce.
- More Ice Cream, More Sauce: Spread the remaining half of your softened ice cream over this new bar layer. Drizzle another third of your sauce generously.
- Top it Off: Take your whipped topping out of the freezer (if frozen) and let it thaw slightly. Gently spread it over the top layer of ice cream and sauce. Drizzle the final third of your hot fudge/caramel sauce in a pretty pattern, or just blob it on—again, no judgment. Sprinkle on all those glorious toppings!
- The Grand Freeze: This is the most crucial step. Cover your masterpiece with plastic wrap or foil and place it back in the freezer. **Freeze for at least 4 hours, but preferably overnight**, until it’s super solid.
- Serve It Up: When you’re ready to serve, use the parchment/foil overhang to lift the entire cake out of the dish. Place it on a cutting board, let it sit for 5-10 minutes (this makes slicing easier!), then slice into generous portions. Enjoy the applause!
Common Mistakes to Avoid
Even though this is an easy-peasy recipe, a few rookie blunders can occur. Let’s make sure you don’t fall victim!
- Forgetting to line the pan: Trust me, you do not want to chisel a frozen ice cream cake out of a dish. **Line that pan!**
- Impatience is not a virtue here: Not freezing between layers adequately will result in a delicious but structurally unsound tower of melting goodness. Take the extra 30 minutes.
- Over-softening the ice cream: We want spreadable, not drinkable. If it’s too soft, it’ll just melt into the layers below. A little firm is good.
- Skipping the unwrapping: Trying to eat plastic is generally frowned upon. Unwrap ALL the ice cream bars before you start layering, smarty pants.
Alternatives & Substitutions
Get creative! This recipe is your canvas.
- Ice Cream Bar Flavor: Use any kind! Classic chocolate-coated, peanut butter-filled, or even those fancy ones with cookies inside. They all work.
- Ice Cream Flavor: Mix and match! Chocolate ice cream with vanilla bars, mint chip with chocolate bars, or even two different ice cream flavors in your two layers.
- Sauces: Beyond hot fudge and caramel, try a strawberry syrup, a jarred dulce de leche, or even a melted peanut butter drizzle.
- “Crust”: Want a *real* crust? Crush some Oreos or graham crackers, mix with about 1/4 cup melted butter, press into the bottom of your lined pan, and freeze for 15 minutes before adding your first layer of bars. It’s extra work, FYI, but totally worth it if you’re feeling ambitious.
- Toppings Galore: Crushed candy bars, toasted coconut, maraschino cherries – go wild!
FAQ (Frequently Asked Questions)
- Can I use store-brand ice cream bars? Absolutely! They’re often just as good, and your wallet will thank you. No snobbery here.
- How long does it really need to freeze? Honestly, **at least 4 hours, but overnight is ideal.** You want it solid enough to slice without an ice cream avalanche.
- What if my ice cream is too hard to spread? Let it sit on the counter for 5-10 minutes. **Don’t microwave it**, unless you want ice cream soup (which, no judgment, is also a valid dessert).
- Can I make this ahead of time for a party? Oh, heck yes! That’s the beauty of it. Make it days in advance, keep it frozen, and pull it out when you need to impress everyone.
- Is this actually healthy? Bless your heart. It’s ice cream cake. It’s for happiness, celebration, and satisfying deep cravings, not kale smoothies. Enjoy every delicious bite!
- Do I *have* to use whipped cream? No, but it’s a nice, lighter touch. You could also do a third layer of ice cream, or just let the sauces and other toppings shine on their own.
Final Thoughts
So there you have it, champ. A show-stopping, crowd-pleasing, utterly delicious ice cream cake made with minimal effort and maximum flair. Go forth and conquer your dessert cravings. Share it with friends, or just hoard it all for yourself (I won’t tell). You’ve basically just graduated from dessert-making school with honors, so take a bow! Now, what are you waiting for? Get freezing!


