So, you’re craving something warm, comforting, and absolutely drenched in nostalgia, but the thought of spending all day chained to the kitchen makes you want to just order takeout, huh? Yeah, me too. But what if I told you we could whip up a homemade apple pie, the kind that makes your whole house smell like a warm hug, without any culinary gymnastics? And we’ll pair it with a scoop (or three) of vanilla ice cream because, frankly, what even is apple pie without its frosty BFF? Let’s get baking, buttercup!
Why This Recipe is Awesome
Okay, first things first. This isn’t one of those fussy, ‘measure your flour with a micrometer’ kind of recipes. This is the **”I want deliciousness without the drama”** kind of recipe. It’s practically idiot-proof. Seriously, if I can nail it after a long week, anyone can. It’s got a buttery, flaky crust that practically melts in your mouth, a sweet-tart apple filling that sings, and it pairs perfectly with that cool, creamy vanilla ice cream. Plus, the bragging rights? Immense. Imagine the look on your friends’ faces when you pull this bad boy out of the oven. Pure domestic wizardry, my friend. **It’s comfort food that actually comforts you while making it.**
Ingredients You’ll Need
Gather your troops, aspiring pie master!
- **For the Crust (AKA the Golden Hug):**
- **2 ½ cups all-purpose flour:** The base of all good things.
- **1 teaspoon salt:** Just a pinch to wake everything up.
- **1 cup (2 sticks) unsalted butter, very cold and cubed:** The secret to flakiness! Don’t skimp here, or let it get melty.
- **½ cup ice water (approx.):** The magic binder. Keep it chilly!
- **For the Filling (AKA the Apple-y Goodness):**
- **6-8 medium apples, mixed varieties preferred (like Granny Smith for tartness, Honeycrisp for sweetness):** Peeled, cored, and sliced about ¼-inch thick. Don’t be shy with the apple count!
- **½ cup granulated sugar:** Sweetness for your soul.
- **¼ cup packed light brown sugar:** Adds a lovely depth.
- **¼ cup all-purpose flour (or cornstarch):** To thicken that luscious filling.
- **1 teaspoon ground cinnamon:** Because apples and cinnamon are soulmates.
- **¼ teaspoon ground nutmeg:** A little warmth, a little spice.
- **1 tablespoon lemon juice:** Brightens everything up and prevents browning.
- **2 tablespoons unsalted butter, cut into small pieces:** To dot over the filling for extra richness.
- **For the Glaze & Serve:**
- **1 egg, beaten (for egg wash):** Gives it that glorious golden shine.
- **1 tablespoon coarse sugar (optional):** For a little sparkle and crunch.
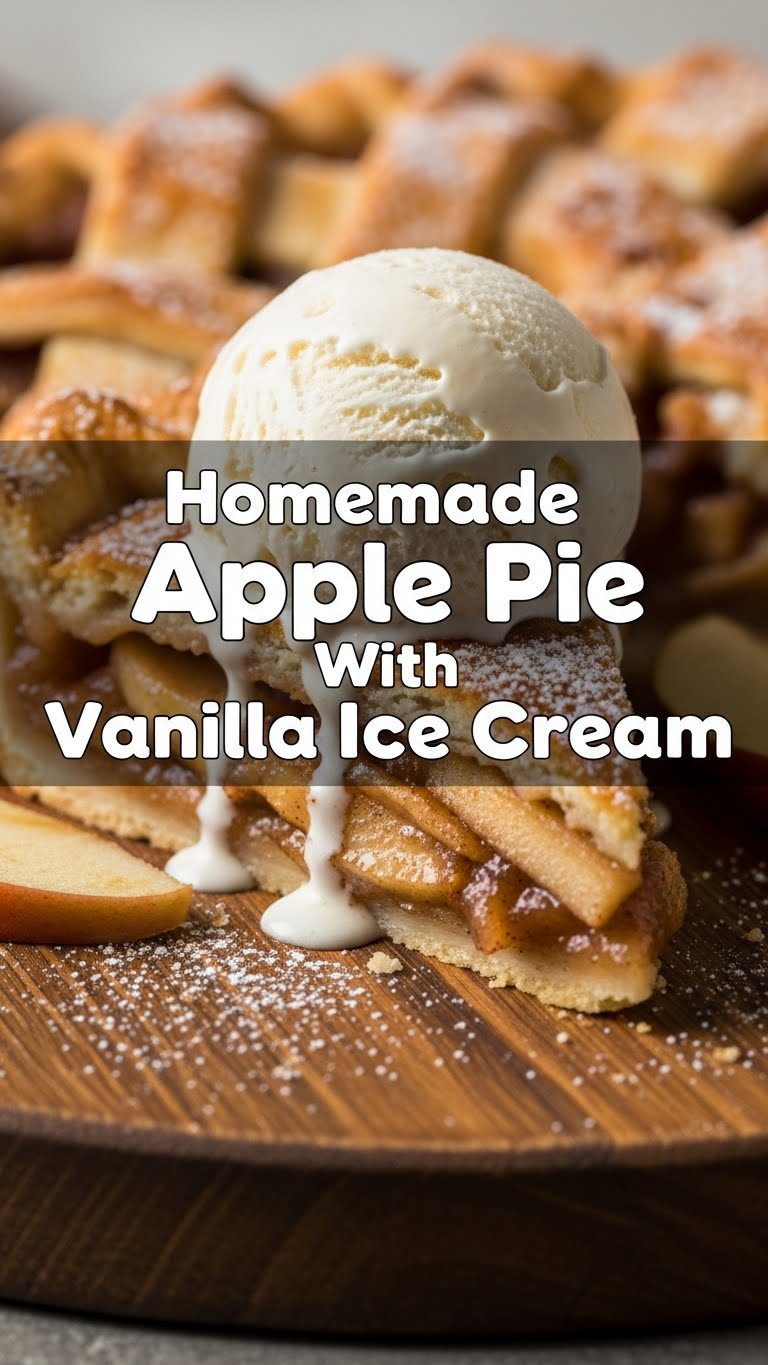
- **Vanilla ice cream:** Mandatory. Don’t even think about skipping it.
Step-by-Step Instructions
- **Make the Crust (Chill Out, Literally):** In a large bowl, whisk together flour and salt. Add the cold, cubed butter and cut it into the flour using a pastry blender, two knives, or your very clean fingertips. You want pea-sized crumbles, not a smooth paste. **Don’t overmix!** Gradually add ice water, one tablespoon at a time, mixing until the dough just comes together. It should be shaggy, not wet. Divide the dough in half, flatten each into a disc, wrap tightly in plastic, and **chill in the fridge for at least 30 minutes (or up to 2 days!).**
- **Prep the Apples (Get Slicing!):** While the dough chills, peel, core, and slice your apples. Toss them in a large bowl with granulated sugar, brown sugar, flour (or cornstarch), cinnamon, nutmeg, and lemon juice. Mix gently until the apples are evenly coated. Set aside.
- **Roll Out the Dough (Time to Shine):** On a lightly floured surface, roll out one disc of chilled dough into a 12-inch circle. Carefully transfer it to a 9-inch pie plate. Trim the edges, leaving about a ½-inch overhang. Pop it back in the fridge while you roll out the second disc.
- **Fill ‘Er Up!:** Pour the apple filling into the chilled pie crust. Arrange the apples evenly and try to mound them slightly in the center. Dot the top of the apples with the small pieces of butter.
- **Top It Off (Get Creative!):** Roll out your second dough disc. You can either place it directly over the apples (making a few slits for steam) or get fancy and do a lattice top (YouTube is your friend for quick lattice tutorials!). Trim the edges, leaving about a ½-inch overhang.
- **Seal the Deal & Glam Up:** Fold the top crust overhang under the bottom crust edge. Crimp the edges together using your fingers or a fork to seal. Brush the top crust with the beaten egg wash and sprinkle with coarse sugar, if using. **Pro tip: For extra flakiness, chill the assembled pie for another 15-20 minutes before baking!**
- **Bake It Baby!:** Preheat your oven to **425°F (220°C)**. Place the pie on a baking sheet (to catch any drips). Bake for 15-20 minutes, then reduce the oven temperature to **375°F (190°C)** and continue baking for another 35-45 minutes, or until the crust is golden brown and the filling is bubbly. If the crust starts browning too quickly, loosely tent it with aluminum foil.
- **Cool Down (The Hardest Part):** Let the pie cool on a wire rack for at least 2-3 hours before slicing. **Seriously, resist the urge to cut it too soon!** This allows the filling to set properly, otherwise, you’ll have a runny mess.
- **Serve with a Smile (and Ice Cream!):** Once cool enough, slice and serve warm with a generous scoop (or two!) of vanilla ice cream. Enjoy your masterpiece!
Common Mistakes to Avoid
Look, we all make ’em. But with these heads-ups, you’ll dodge the most common pie pitfalls:
- **Warm Butter, Sad Crust:** Thinking you can get away with slightly soft butter in your crust? Rookie mistake! **Cold butter is key for flaky layers.** If it gets too warm, pop it back in the fridge.
- **Overworking the Dough:** Mixing the crust dough too much develops the gluten, making it tough. We want tender, flaky perfection, not a hockey puck. **Mix just until combined.**
- **Not Chilling the Dough:** Skipping the chill time makes the dough harder to roll and more prone to shrinking in the oven. **Don’t rush the chill.** It’s like sending your dough to a spa.
- **Under-baking the Bottom Crust:** Is there anything worse than a soggy bottom? Nope. Make sure your oven is preheated, and don’t pull the pie out too early. If you’re really worried, sometimes baking on a preheated pizza stone helps.
- **Cutting It Hot:** The filling needs time to set up as it cools. Slice it too soon, and you’ll have a delicious, but messy, puddle. **Patience, my friend, patience.**
Alternatives & Substitutions
Feeling rebellious? Here are some tweaks:
- **Crust:** Don’t have time or energy for homemade? A **store-bought pie crust** (the refrigerated kind, not the frozen pre-formed ones, IMO) is a perfectly acceptable shortcut. No judgment here! Or, try an **oatmeal crumble topping** instead of a second crust for an apple crisp pie vibe.
- **Apples:** Can’t find mixed apples? Stick with what you have! Just know that using only super-sweet apples might make the pie a bit too sweet, and only tart ones might be too sour. Adjust sugar accordingly. **Pears or a mix of apples and pears** also make a killer pie!
- **Spices:** Not a nutmeg fan? Leave it out! Add a pinch of **allspice or ground ginger** for a different kick. Cardamom is also a secret weapon in apple pies!
- **Ice Cream:** Vanilla is classic, but why not try **caramel swirl, cinnamon, or even a good quality pecan praline** ice cream? Or go dairy-free with a plant-based vanilla option. You do you!
FAQ (Frequently Asked Questions)
Got questions? I’ve got answers, mostly:
- **Can I use margarine instead of butter in the crust?** Well, technically yes, but why hurt your soul (and your pie’s flavor) like that? Margarine has a higher water content and different fat composition, which usually means a less flaky, less flavorful crust. **Stick with butter for best results.**
- **My crust always shrinks in the oven. What gives?** Likely culprit: not chilling your dough enough! Or, you’re overworking it. **Give that dough a good chill** (at least 30 mins per disc, even 15-20 mins for the assembled pie) to relax the gluten before baking.
- **What are the best apples for pie?** A mix is always best! Granny Smiths offer tartness and hold their shape, while Honeycrisp, Fuji, or Braeburn bring sweetness and good texture. Avoid super soft apples like Red Delicious – they’ll turn to mush.
- **How do I prevent the top crust from getting too brown before the pie is done?** Easy peasy! If it’s browning too quickly, just **loosely tent a piece of aluminum foil** over the pie. That’ll shield it while the rest bakes.
- **Can I make this pie ahead of time?** Absolutely! You can assemble the entire pie (unbaked) and **freeze it for up to 3 months.** When ready to bake, place the frozen pie directly into a preheated oven (no thawing needed!) and add about 20-30 minutes to the baking time. Baked pie lasts covered at room temp for 2 days, or in the fridge for up to 5 days.
- **What if my filling is too runny?** This usually happens if the apples release too much liquid and there wasn’t enough thickener (flour/cornstarch) or the pie wasn’t cooled long enough. Next time, try adding an extra tablespoon of thickener, or ensure your apples aren’t super wet when you toss them. And **cool, cool, cool!**
Final Thoughts
And there you have it! A homemade apple pie that’s going to make you feel like a culinary rockstar without having to enroll in pastry school. It’s sweet, it’s comforting, and it’s the perfect excuse to snuggle up with a big slice and a even bigger scoop of ice cream. Now go impress someone—or yourself, because let’s be real, you deserve it—with your new pie-making prowess. You’ve earned it, chef! And don’t forget to send me a pic!


