So you’re scrolling, you’re hungry, and suddenly a wild craving for something cozy, sweet, and totally brag-worthy appears? But also, you’re not trying to win *MasterChef* tonight? **Good news, buttercup!** **FYI**, this is where your culinary dreams (the easy ones, anyway) come true. We’re making pumpkin pie, but like, the *cool* pumpkin pie. The one with a secret weapon: maple syrup.
Why This Recipe is Awesome
Listen, I get it. Life’s a rollercoaster, and sometimes you just need a reliable, delicious, *easy* win. This isn’t just a pumpkin pie; it’s **the** pumpkin pie. Why? Because it’s got that classic spiced comfort, but then we throw in maple syrup, making it feel fancy without actually *being* fancy.
Plus, it’s so straightforward, you could probably make it in your sleep (though I don’t recommend baking while unconscious, for safety reasons). It’s basically foolproof, even for those of us who sometimes mistake salt for sugar. (Don’t ask.)
Ingredients You’ll Need
- 1 (15-oz) can pumpkin puree: *The real deal, please! Not pie filling, unless you enjoy a culinary mystery.*
- 2 large eggs: *Our little binding heroes. At room temp, if you’re feeling fancy, but not a deal-breaker.*
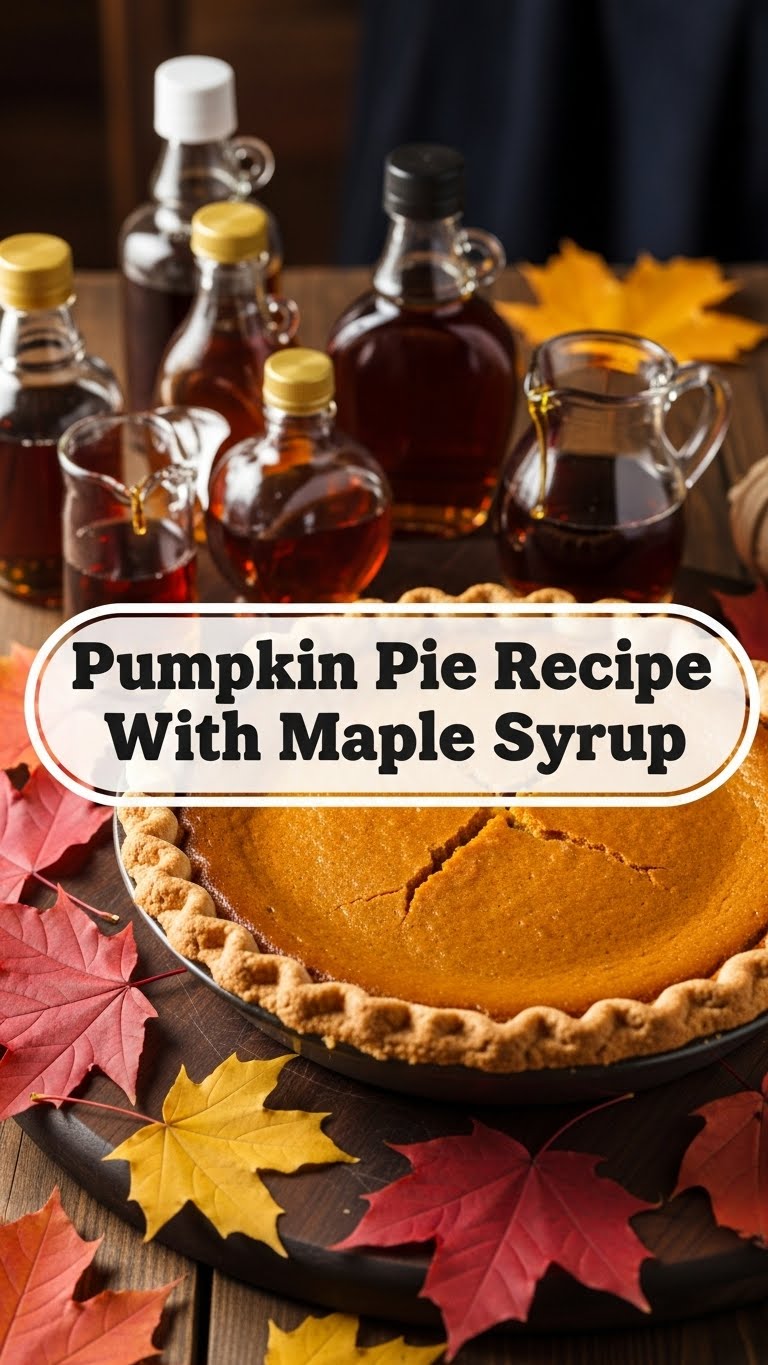
- ½ cup pure maple syrup: *This is where the magic happens! Get the good stuff, not the corn syrup imposters. Your taste buds will thank you.*
- ½ cup heavy cream (or evaporated milk): *For that luscious, creamy texture. Whole milk works too, if you’re living on the edge.*
- ¼ cup packed light brown sugar: *Just a touch, because the maple syrup is doing most of the sweet lifting.*
- 1 tsp ground cinnamon: *Basic, but essential.*
- ½ tsp ground ginger: *Adds a little kick!*
- ¼ tsp ground cloves: *A tiny bit goes a long way, trust me.*
- ¼ tsp ground nutmeg: *Because what’s pumpkin pie without nutmeg?*
- Pinch of salt: *Enhances all the other flavors. Don’t skip it!*
- 1 (9-inch) unbaked pie crust: *Store-bought is totally fine! We’re making pie, not judging life choices. If you’re a baking wizard and making your own, hats off to you!*
Step-by-Step Instructions
- Get Hot, Oven! Preheat your oven to 425°F (220°C). Grab that unbaked pie crust and place it on a baking sheet. Why a baking sheet? **Spill insurance**, my friend. You’re welcome.
- Wet Mix Time: In a large bowl, whisk together the pumpkin puree, eggs, maple syrup, heavy cream (or milk), and brown sugar until it’s all smooth and looking cozy.
- Spice it Up! In a separate, smaller bowl, mix all your dry spices: cinnamon, ginger, cloves, nutmeg, and that pinch of salt. Give them a good stir so they’re evenly distributed.
- Combine Forces: Pour the glorious spice mix into your wet pumpkin mixture. Whisk it all together until no streaks of spice remain and the filling is one beautiful, harmonious orange color. **Don’t overmix**, just combine.
- Fill ‘er Up! Carefully pour your pumpkin mixture into the unbaked pie crust. Try not to spill, but if you do, that baking sheet is your hero.
- Bake, Then Chill: Pop that pie into your preheated oven. Bake at 425°F (220°C) for 15 minutes. Then, without opening the oven door (seriously, resist!), reduce the temperature to 350°F (175°C) and continue baking for another 35-45 minutes. The pie is done when a knife inserted about one inch from the edge comes out clean. The center might still be a *little* wobbly; that’s okay, it’ll firm up as it cools.
- Patience, Grasshopper: Remove the pie from the oven and let it cool completely on a wire rack. **This is crucial!** We’re talking at least 2-3 hours, or even better, chill it in the fridge for a few hours. A cold pie slices way better and tastes even more divine.
Common Mistakes to Avoid
- Forgetting to Preheat: *Rookie move! Your pie won’t bake evenly, and you’ll end up with a sad, soggy bottom. **Preheat your oven!** It’s not a suggestion, it’s a command.*
- Using Pumpkin Pie Filling Instead of Puree: *They look similar, but they are NOT the same. Filling already has spices and sugar, and you’ll end up with an overly sweet, weirdly spiced pie. Read the label, friend!*
- Overmixing the Filling: *Once everything is just combined, stop! Overmixing can incorporate too much air, leading to cracks in your pie as it bakes and cools. We want smooth, not cracked!*
- Skipping the Chill Time: *I know, I know, you want to dive in. But cutting into a warm pie is a recipe for a sloshy mess. **Let it cool completely**, preferably in the fridge. The wait is worth it, promise!*
- Ignoring the Oven Temperature Change: *That initial blast of heat helps the crust, then lowering it allows the filling to cook gently. Don’t just blast it at 425°F the whole time unless you want burnt edges and a raw middle.*
Alternatives & Substitutions
- Crust Talk: If you’re feeling ambitious (or just have a preferred recipe), totally make a **homemade pie crust**. But honestly, a good quality store-bought one will save you time and stress, and nobody will judge you. Unless they’re pie crust snobs, in which case, make them their own pie.
- Dairy Swaps: Don’t have heavy cream? Evaporated milk works beautifully for richness. Whole milk is also a viable option if you want a slightly lighter (but still delicious) pie. **Almond milk or oat milk** can work in a pinch for a dairy-free version, but the texture might be a *tad* less rich.
- Spice Shenanigans: Want more kick? Add a tiny pinch of **cardamom or allspice**. Less ginger? No problem! Adjust to your taste buds. This is *your* pie!
- Sweetness Control: If you prefer it less sweet, you can reduce the brown sugar by half or even omit it, letting the maple syrup shine. If you like it sweeter, add a couple more tablespoons of brown sugar. **Taste the raw filling (before eggs!)** to get a feel for the spice and sweetness balance.
FAQ (Frequently Asked Questions)
- “My pie cracked! What did I do wrong?!” Oh, the horror! Usually, this happens from **overbaking** or a sudden temperature change when cooling. Make sure not to overbake (remember that slight wobble in the center is good!), and let it cool *slowly* on the counter before even thinking about the fridge. Still delicious, though, even with a battle scar!
- “Can I use artificial maple-flavored syrup instead of pure maple syrup?” Well, technically yes, but **why hurt your soul like that?** Pure maple syrup is key to that gourmet flavor we’re going for. Artificial stuff will just make it taste… well, artificial. Treat yourself!
- “Do I really need to chill it completely before serving?” Yes, yes, a thousand times, yes! Warm pumpkin pie is prone to collapsing into a glorious, delicious, but rather un-photogenic mess. Chilling allows the filling to fully set, making for **cleaner slices** and a better overall experience. Patience, young padawan.
- “Can I make this dairy-free?” Absolutely! Swap the heavy cream for full-fat coconut milk (the canned kind, not the beverage) or a good plant-based cream alternative. The flavor might shift slightly, but it’ll still be delightful!
- “How long does this pie last?” If kept covered and refrigerated, it’s usually good for **3-4 days**. But let’s be real, it probably won’t last that long.
- “Can I freeze pumpkin pie?” You bet! Bake and cool completely, then wrap it tightly in plastic wrap and then foil. It’ll keep in the freezer for up to a month or two. Thaw in the fridge overnight. **Pro tip: freeze slices!** It’s easier for portion control (or lack thereof).
Final Thoughts
See? Told you it was easy! You’ve just whipped up a pie that’s bursting with autumnal goodness, spiced just right, and kissed with the sweet embrace of maple syrup. It’s the kind of pie that makes people say, “Wait, *you* made this?!” And you can just casually shrug and say, “Oh, this old thing? It was nothing.” (Even though it was totally something awesome!)
So go ahead, grab a slice (or two, I’m not judging), pour yourself a coffee or cider, and bask in your culinary glory. You’ve earned it! Now go forth and spread pumpkin-maple joy!


