So, you’ve got that craving, right? The one that screams ‘cozy autumn vibes’ but also whispers ‘please don’t make me do a lot of work.’ Yep, I hear you. And because I’m basically your culinary fairy godparent (minus the wand, mostly), I’ve got the perfect solution: Cookies with Pumpkin Pie Filling. It’s like your favorite holiday pie had a baby with your go-to cookie, and frankly, it’s adorable and delicious. Let’s get baking!
Why This Recipe is Awesome
Let’s be real, life’s too short for complicated baking. This recipe? It’s the culinary equivalent of putting on sweatpants after a long day. **Comforting, no-fuss, and utterly satisfying.** Plus, it looks way more impressive than the effort it actually requires. You can totally pretend you slaved over these, and no one will be the wiser. It’s practically witchcraft, I tell ya.
Even my notoriously oven-phobic friend managed these without setting off the smoke alarm. #Winning. It’s an ideal way to get your pumpkin fix without committing to a whole pie (because sometimes, you just want a bite, not a whole commitment, amirite?). These cookies are soft, chewy, and burst with that creamy, spiced pumpkin goodness. Prepare for compliments!
Ingredients You’ll Need
Gather your baking squad! Here’s what you’ll need to make these little pockets of joy:
- **All-Purpose Flour:** 1 ½ cups. Because we’re not fancy. Unless you *are* fancy, then use whatever artisanal flour your heart desires, but honestly, it won’t make *that* much difference here.
- **Baking Soda:** 1 teaspoon. Our little leavening hero, making sure our cookies are soft and puffy, not flat and sad.
- **Salt:** ½ teaspoon. Just a pinch to balance out all that sweetness. Don’t skip it, it makes a difference!
- **Unsalted Butter:** ½ cup (1 stick), softened. Because we’re controlling the salt, not letting the butter boss us around. And softened means it won’t fight your mixer. **Pro tip: leave it on the counter for an hour. Don’t microwave it unless you want sad, greasy cookies.**
- **Granulated Sugar:** ¼ cup. For that classic cookie sweetness.
- **Brown Sugar:** ½ cup, packed. Hello, chewiness! Brown sugar is the secret to that lovely soft texture.
- **Egg:** 1 large. The binder that holds it all together.
- **Vanilla Extract:** 1 teaspoon. Because what’s a cookie without vanilla? It’s like a hug without the squeeze.
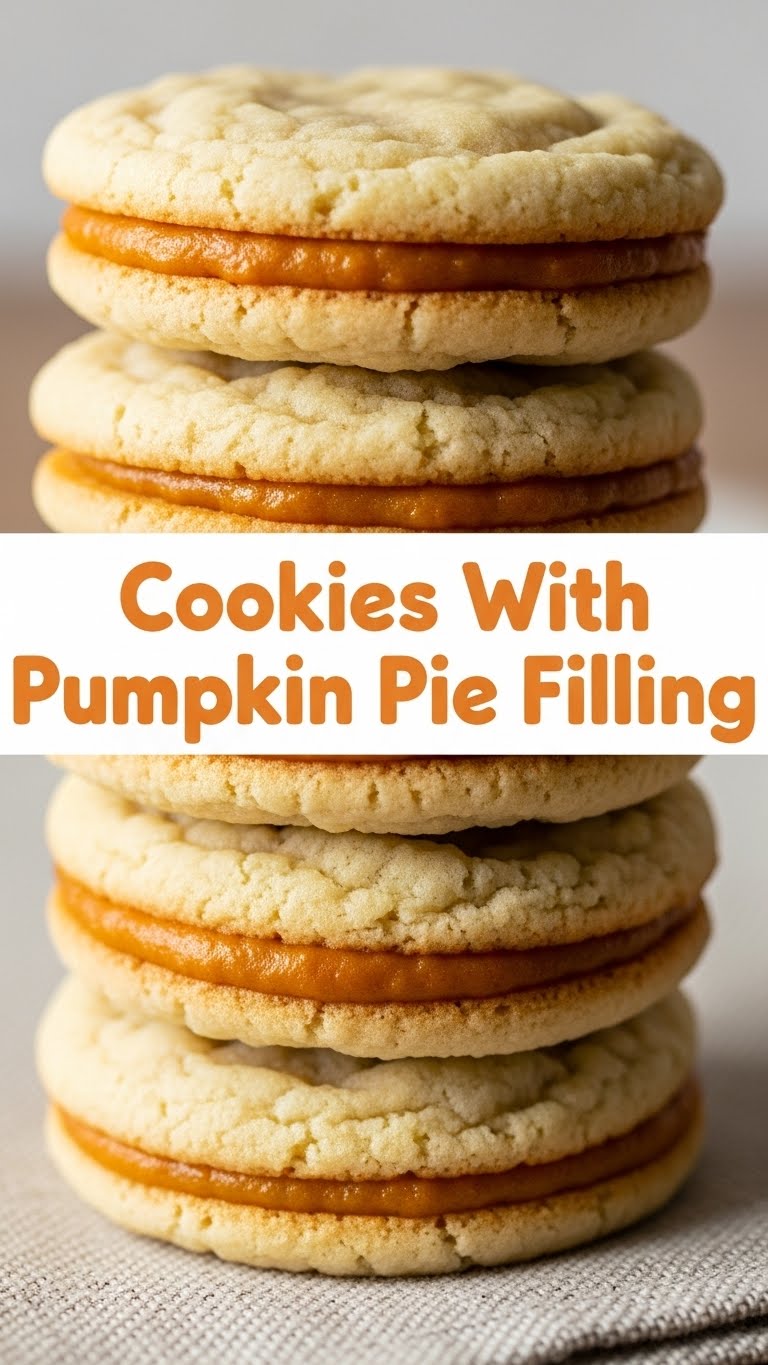
- **Pumpkin Pie Filling:** 1 can (about 15 ounces). The star of the show! Canned is totally fine, no judgment here. Just make sure it’s *filling*, not plain pumpkin puree. Big difference, trust me.
- **(Optional) Confectioners’ Sugar:** For dusting, if you want to make them look extra Instagrammable.
Step-by-Step Instructions
- **Get the Oven Ready.** Preheat your oven to 375°F (190°C). Line two baking sheets with parchment paper. This is key for easy cleanup and no sticky situations.
- **Mix the Dry Stuff.** In a medium bowl, whisk together the flour, baking soda, and salt. Set aside. This ensures everything is evenly distributed, so no weird pockets of just baking soda.
- **Cream the Good Stuff.** In a large bowl, or your stand mixer if you’re feeling fancy, cream together the softened butter and both sugars until light and fluffy. This is where the magic starts, creating that airy base for your cookies.
- **Add Wet Ingredients.** Beat in the egg and vanilla extract until just combined. Don’t overmix here; we’re just getting acquainted.
- **Combine Wet & Dry.** Gradually add the dry ingredients to the wet ingredients, mixing on low speed until just combined. **Stop mixing as soon as no dry streaks of flour remain.** Overmixing develops gluten, making tough cookies, and nobody wants that.
- **Chill Out (Briefly).** Cover the dough and chill in the fridge for about 15-20 minutes. This helps the cookies hold their shape better and prevents them from spreading too much.
- **Scoop ‘Em Up.** Take spoonfuls of dough (about 1 tablespoon each) and roll them into balls. Flatten each ball slightly on the prepared baking sheets. We’re creating a little divot for our filling here.
- **Bake the Shells.** Bake for 8-10 minutes, or until the edges are lightly golden and the centers are still soft. **Don’t overbake!** You want them slightly underdone for that perfect chewy texture.
- **Cool Down.** Let the cookies cool on the baking sheets for 5 minutes before transferring them to a wire rack to cool completely. They’ll firm up as they cool.
- **Fill ‘Em Up!** Once completely cool, take your pumpkin pie filling and spoon a dollop onto the center of half the cookies. Then, gently top with another cookie to create a sandwich. If you’re feeling extra, dust with a little confectioners’ sugar.
Common Mistakes to Avoid
- **Thinking ‘chilling’ is optional.** It’s not, friend. **Seriously, don’t skip the chill time.** It helps prevent your cookies from spreading into one giant, shapeless blob of regret.
- **Eyeballing measurements.** Baking is science, not a suggestion. A little extra flour or sugar might seem harmless, but it can throw off the whole cookie vibe. Use proper measuring cups and spoons, IMO.
- **Overmixing the dough.** As mentioned, tough cookies are sad cookies. Mix until *just* combined.
- **Baking on warm sheets.** If you’re doing multiple batches, make sure your baking sheets are cool before placing new dough on them. Warm sheets will start melting the butter too soon, leading to more spread.
- **Filling hot cookies.** Patience, grasshopper! If you try to fill warm cookies, the filling will melt and run everywhere, creating a delicious but messy situation. Wait until they’re completely cool.
Alternatives & Substitutions
Feeling creative? Here are a few ways to tweak this recipe:
- **Spice It Up!** If you’re feeling extra, a pinch of extra cinnamon or a tiny grating of fresh nutmeg in the cookie dough can elevate things. Or a dash of pumpkin pie spice blend!
- **Butter Swap?** You *could* use shortening for a softer, cakier cookie, but I’m a butter purist for flavor. If you’re going for dairy-free, use a solid plant-based butter alternative.
- **Gluten-Free Fun.** Swap the all-purpose flour for a 1:1 gluten-free baking blend. You might need a tiny bit more liquid or a slightly longer chill time, so keep an eye on the dough.
- **Filling Variations.** Apple butter, cream cheese frosting, or even Nutella (if you’re feeling rebellious!) could work here. Just make sure it’s a thick consistency so it doesn’t ooze out everywhere. FYl, cream cheese frosting + pumpkin cookie is divine!
FAQ (Frequently Asked Questions)
**Can I use plain pumpkin puree instead of pumpkin pie filling?**
Nuh-uh. Plain pumpkin puree is just cooked pumpkin. Pumpkin pie filling already has sugar and spices. Your cookies would taste, shall we say, ‘rustic’ without the proper filling. **Stick to the filling!**
**How long do these cookies last?**
If they even make it past the first hour? Probably 3-4 days in an airtight container on the counter. Beyond that, they might stage a quiet rebellion against your taste buds.
**Can I make the cookie dough ahead of time?**
Absolutely! You can store the unbaked dough (covered) in the fridge for up to 2-3 days. Just let it come to room temperature for about 15-20 minutes before scooping and baking, or give it an extra minute or two in the oven.
**Can I freeze these cookies?**
You bet! You can freeze the baked, unfiilled cookies in an airtight container for up to 3 months. Thaw at room temp, then fill. You can also freeze the filled cookies, but the filling texture might change slightly after thawing. Best to freeze unfiilled and then fill fresh.
**My cookies spread too much! What happened?**
Could be a few things! Your butter might have been too soft, the dough wasn’t chilled enough, or your oven temperature might be off (a common culprit!). Try chilling the dough longer next time, or adding a tiny bit more flour (like a tablespoon) if you live in a really humid climate.
Final Thoughts
See? Told you it was easy! Now you’ve got these little pockets of autumnal joy ready to make your day (or impress your friends, or just be devoured solo while binge-watching your favorite show – no judgment here!). Go forth and bake, you magnificent human! **You’ve totally nailed it.**


