Okay, let’s be real. You’re probably scrolling through recipes because you just had a sudden, undeniable craving for something warm, comforting, and utterly delicious. But also, like, zero effort? You want that “I’m a domestic goddess/god” vibe without actually spending all day in the kitchen, right? Same. Welcome to your new favorite obsession: Apple Pie with Caramel Sauce. It’s basically a warm hug, but you can eat it.
Why This Recipe is Awesome
Because it’s simple. So simple, it’s almost insulting to call it “baking.” We’re talking about a pie that practically bakes itself while you binge-watch your favorite show. It uses **store-bought pie crusts** because, honestly, who has time for scratch-made dough unless you’re entering a competition? Plus, the caramel sauce? It’s the MVP, the Beyoncé of the dessert world, elevating a classic apple pie from “yum” to “OMG, I need more.” It’s idiot-proof, even I didn’t mess it up, and I once set off a smoke alarm making toast. So, yeah, you’ve got this.
Ingredients You’ll Need
Gather your troops! These are the essentials for your soon-to-be legendary pie. Don’t skimp on the butter, FYI.
- Apples (6-8 medium): Granny Smiths are the OG for that perfect tart-sweet balance, but a mix with Honeycrisp or Fuji is also a power move.
- Pre-made Pie Crusts (2): One box, two crusts. Easy peasy. We’re here for convenience, not a baking marathon.
- Granulated Sugar (1/2 cup): To sweeten things up a bit.
- Brown Sugar (1/4 cup, packed): Adds a deeper, molasses-y flavor.
- All-Purpose Flour (2 tablespoons): Our secret weapon to thicken the apple juices, so your pie isn’t a soupy mess.
- Ground Cinnamon (1 teaspoon): Because what’s apple pie without cinnamon? A sad, sad pie.
- Nutmeg (1/4 teaspoon): Just a whisper, for extra warmth.
- Unsalted Butter (2 tablespoons): Cut into small pieces. It’s going to melt into pure deliciousness.
- Egg (1, for egg wash): Whisked. For that gorgeous golden-brown crust.
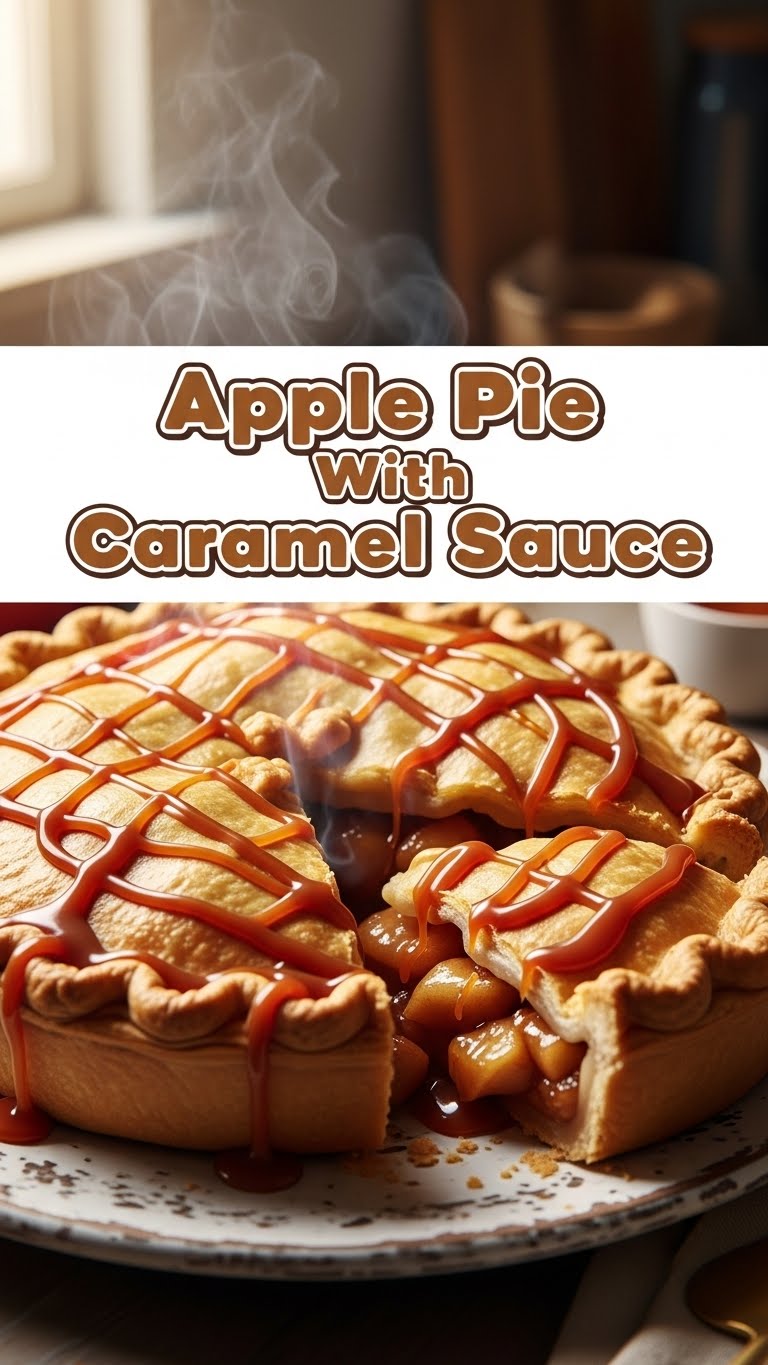
- Caramel Sauce (1/2 cup or more!): Store-bought is totally acceptable here. No shame in that game. Or, if you’re feeling ambitious, make your own.
- A pinch of salt: Just a tiny bit to balance everything.
Step-by-Step Instructions
- Prep Your Apples: First things first, peel, core, and slice those apples. Aim for slices about 1/4 inch thick. Don’t go too thin; we want them to hold their shape and have some bite! Toss them into a large bowl.
- Mix the Filling: In a separate smaller bowl, whisk together the granulated sugar, brown sugar, flour, cinnamon, nutmeg, and that tiny pinch of salt. Pour this magical mixture over your sliced apples. Now, give it a good toss until every apple slice is coated. This is where the flavor party starts!
- Crust Time (Part 1): Unroll one of your pre-made pie crusts and gently fit it into a 9-inch pie dish. Don’t be afraid to gently press it into the bottom and up the sides.
- Fill ‘Er Up: Spoon your apple mixture into the crust-lined dish, mounding it slightly in the center. Dot the top of the apples with those small pieces of butter. This adds richness and helps create that glorious, bubbly filling.
- Crust Time (Part 2): Carefully unroll the second pie crust over the top of your apple mountain. Trim the edges, leaving about an inch of overhang. Now, crimp those edges together, either with your fingers or a fork, to seal the deal. For extra flair, cut a few slits in the top crust. This lets steam escape and prevents a pie explosion!
- Egg Wash & Bake: Whisk that egg and brush it all over the top crust. This gives your pie a beautiful golden sheen. Now, **preheat your oven to 425°F (220°C)**. Pop the pie in for 15 minutes.
- Reduce & Finish: After 15 minutes, reduce the oven temperature to 375°F (190°C) and continue baking for another 35-45 minutes. You want the crust to be golden brown and the filling bubbly. If the crust is browning too quickly, you can loosely cover the edges with foil.
- Cool Down (The Hard Part): Once baked, let that beauty cool on a wire rack for at least 2-3 hours. Seriously, this is crucial! It allows the filling to set properly. Patience, grasshopper.
- Caramel Drizzle: Just before serving, warm up your caramel sauce slightly (microwave for 15-30 seconds works wonders). Drizzle generously over each slice. Go wild!
Common Mistakes to Avoid
- Not Chilling the Pie (or the dough): Warm dough is a sticky, uncooperative mess. If your crust feels too warm, pop the whole pie in the fridge for 15-20 minutes before baking.
- Under-baking: An under-baked pie means mushy apples and a potentially raw bottom crust. Make sure the filling is visibly bubbling, and the crust is truly golden brown, not just pale. When in doubt, add 5-10 more minutes.
- Skipping the Flour in the Filling: Rookie mistake! Without the flour, your pie will be a watery disappointment. The flour is what helps thicken those delicious apple juices.
- Cutting it Too Soon: I know, it’s torture. But cutting into a hot pie means the filling hasn’t set, and it’ll just ooze everywhere. Let it cool; your future self will thank you.
Alternatives & Substitutions
Feeling a little rebellious? Here are some ways to shake things up, because rules are more like guidelines, right?
- Apple Varieties: Not a Granny Smith fan? No problem! Use Honeycrisp for a sweeter, crispier bite, or a mix of Gala and Fuji for a mellow sweetness. Just avoid super soft apples like Red Delicious; they’ll turn to mush.
- Spice it Up: Add a pinch of ground ginger or cardamom to the filling for an extra layer of warmth. Or, if you’re feeling adventurous, a tiny dash of allspice.
- Vegan-Friendly: For our plant-based pals, use a vegan pie crust (many store-bought brands are accidentally vegan!) and swap the butter for a good quality plant-based butter. As for the egg wash, a little plant milk brushed on top works just as well for browning. Dairy-free caramel is also readily available!
- Crust from Scratch: If you’re feeling ambitious (and have more time than I do, bless your heart), by all means, make your own pie crust! It’s a labor of love, and sometimes, that’s what we need.
FAQ (Frequently Asked Questions)
Got questions? I’ve got (casual) answers!
- Can I use frozen apples? Technically yes, but why put yourself through that? They’ll release a ton of water, which can make your pie soggy. If you *must*, thaw them completely and drain them super well. Nobody likes a soggy bottom, eh?
- My crust is browning too fast! Help! Chill! Just grab some aluminum foil and gently tent it over the pie, or crimp strips of foil around the edges. This protects the crust from burning while the filling finishes cooking.
- What kind of caramel sauce should I use? Seriously, any kind you like! A good quality jarred caramel sauce is perfect. If you’re feeling fancy, make your own, but no pressure. This recipe is about keeping it chill.
- Can I make this ahead of time? You can definitely assemble the pie the day before and keep it in the fridge (unbaked), then bake it fresh. Baked pie is best eaten within 2-3 days, though.
- Do I really need to let it cool for 2-3 hours? YES. This is probably the most important step for a perfectly set pie. If you cut it too soon, it’ll be a delicious, but messy, puddle. Resist the urge, my friend.
Final Thoughts
See? You just made an apple pie that looks like you spent hours on it, but really, you were probably chilling, sending funny memes, and feeling quite smug. This pie is perfect for impressing friends, wooing a date, or just treating yourself because, frankly, you deserve it. Now go impress someone—or yourself—with your new culinary skills. You’ve earned it!


