So you’re craving something tasty but too lazy to spend forever in the kitchen, huh? Same. High five! We’ve all been there: staring into the fridge, dreaming of a perfectly roasted chicken, but the thought of preheating a massive oven and then, *gasp*, cleaning it? Yeah, no thanks. Enter your kitchen’s unsung hero, the air fryer! This little wonder is about to become your new best friend for getting that crispy, juicy roast chicken vibe without the drama. Get ready to impress yourself (and maybe a lucky friend or two) with minimal effort and maximum flavor. Let’s get cooking!
Why This Recipe is Awesome
Okay, let’s be real. This isn’t just a recipe; it’s a life hack. First off, it’s pretty much **idiot-proof**. Seriously, even I didn’t mess it up, and my track record with whole birds can be… spotty. You’ll get chicken that’s unbelievably juicy on the inside, with skin so crispy it practically sings a little song when you bite into it. All this, in less time than it takes to watch a mediocre rom-com. Plus, minimal cleanup! No big roasting pan to scrub, just a little air fryer basket that practically cleans itself (okay, maybe not *that* easy, but close enough). It’s perfect for a weeknight dinner, a lazy Sunday, or when you just want to feel like a culinary rockstar without, you know, actually *being* one. Consider this your cheat code to deliciousness.
Ingredients You’ll Need
Gather ’round, fellow food enthusiasts! Here’s what you’ll need for this magic trick. Don’t worry, nothing too fancy, just good old basics.
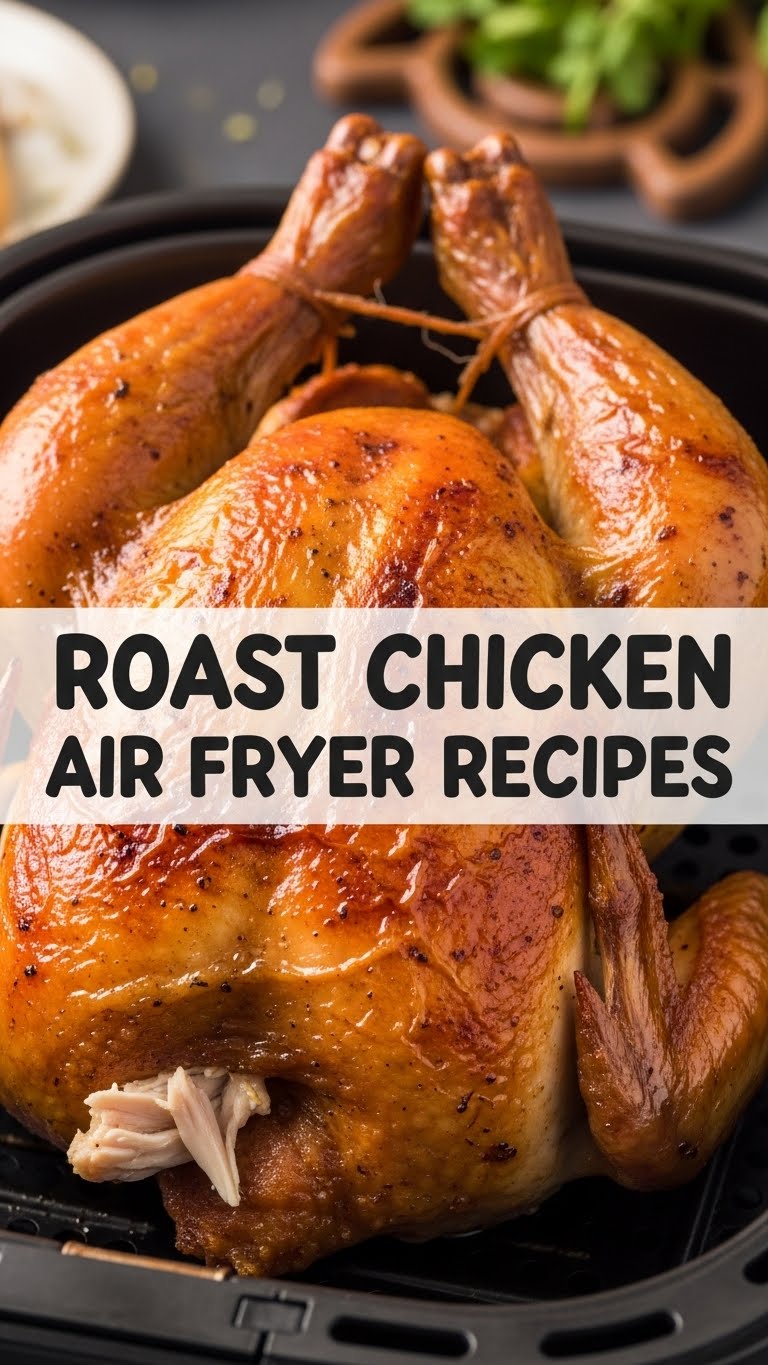
- 1 Small Whole Chicken (2-3 lbs / 1-1.5 kg): The star of our show! Make sure it fits comfortably in your air fryer basket without touching the heating element.
- 1-2 tbsp Olive Oil (or Avocado Oil): For that golden crispiness. Because, why not?
- 1 tsp Salt: Essential. Don’t skimp, unless you like bland chicken (who does?).
- ½ tsp Black Pepper: Freshly ground is always better, IMO.
- 1 tsp Garlic Powder: Because garlic makes everything better. It’s a universal truth.
- ½ tsp Paprika (smoked or sweet): For color and a little extra oomph.
- ½ tsp Dried Herbs (Thyme, Rosemary, or Italian Seasoning): Pick your fighter! Or mix them all, you rebel.
- Optional: Lemon Wedges or Onion Quarters: To stuff into the cavity for extra flavor. Fancy, right?
Step-by-Step Instructions
Alright, apron on (or not, we don’t judge). Let’s get this bird done!
- Prep Your Chicken: First things first, unwrap your chicken. Pat it down with paper towels like you’re prepping for a photoshoot. **Getting it super dry is key for crispy skin!** Remove any giblets from the cavity (unless you have big plans for them, in which case, go wild).
- Season It Up: In a small bowl, mix your salt, pepper, garlic powder, paprika, and dried herbs. Now, drizzle the olive oil all over the chicken, making sure to coat it evenly. Rub that seasoning mix all over the chicken, getting into every nook and cranny. Don’t be shy! If you’re using lemon or onion, stuff them into the cavity.
- Preheat Your Air Fryer: This step is non-negotiable! **Preheat your air fryer to 375°F (190°C) for 5-7 minutes.** Think of it as warming up for the main event.
- Air Fry Time!: Carefully place your seasoned chicken, breast-side up, into the preheated air fryer basket. Try not to let it touch the sides if possible. Close ‘er up!
- Flip and Finish: Cook for about 30-40 minutes, then carefully flip the chicken over (use tongs, seriously). Continue cooking for another 15-25 minutes, or until the internal temperature reaches **165°F (74°C)** in the thickest part of the thigh (without touching the bone).
- Rest and Devour: Once it’s cooked through, carefully remove the chicken from the air fryer and place it on a cutting board. **Let it rest for at least 10 minutes** before carving. This is crucial for juicy meat! It allows the juices to redistribute instead of gushing out when you cut into it.
Common Mistakes to Avoid
Nobody’s perfect, but we can learn from our mistakes (or, better yet, other people’s). Here are a few traps to sidestep:
- Forgetting to Preheat: Rookie mistake! Just like your oven, an air fryer needs to be hot before the food goes in. It helps with even cooking and that coveted crispy skin.
- Overcrowding the Basket: Your air fryer isn’t a sardine can. Give that chicken some space to breathe! If it’s too snug, the air won’t circulate properly, and you’ll end up with steamed chicken instead of roasted. Not ideal.
- Not Drying the Chicken: Remember the photoshoot prep? A wet chicken equals soggy skin. A dry chicken equals *chef’s kiss* crispy skin.
- Skipping the Internal Temp Check: Guessing if your chicken is done is a gamble you don’t want to take. Invest in a meat thermometer! It’s cheap insurance against undercooked (or overcooked) chicken.
- Ignoring the Rest Period: Seriously, don’t just hack into it the second it comes out. That 10-minute rest is like a spa day for your chicken; it makes all the difference in juiciness.
Alternatives & Substitutions
Feeling creative? Or just missing an ingredient? No worries, we got options!
- Different Spices: Not a fan of paprika? Swap it for chili powder for a kick, or onion powder for extra savory depth. Curry powder can also be amazing!
- Fresh Herbs: If you have fresh rosemary, thyme, or sage, chop ’em up and use them! They’ll give an even more aromatic flavor than dried. Just use a bit more (e.g., 1-2 tsp fresh for ½ tsp dried).
- Citrus Boost: Instead of just lemon, try orange slices in the cavity for a sweeter, zesty note.
- Butter, Anyone?: For ultimate rich flavor and even crispier skin, try rubbing a tablespoon of softened butter under the skin before applying oil and seasoning. It’s a game-changer!
- Chicken Pieces Instead of Whole: If a whole chicken seems too daunting or doesn’t fit, this recipe works just as well for bone-in, skin-on thighs, drumsticks, or breasts. Just adjust cooking time (usually less for pieces, around 20-30 mins depending on size) and ensure they reach 165°F.
FAQ (Frequently Asked Questions)
Got questions? We’ve got (casual) answers!
- Can I use frozen chicken? Well, technically you *could* try, but why make things hard for yourself? **Always thaw your chicken completely first!** Frozen chicken will cook unevenly and take ages. Don’t do it.
- My air fryer is small, what now? If your chicken is a tight squeeze, you might need to spatchcock it (cut out the backbone and flatten it). Or, simply stick to chicken pieces. No shame in that game!
- Do I need to flip the chicken? **Yep, absolutely!** Flipping ensures even browning and crispiness all around. Unless you want a half-crispy, half-soggy chicken, which, let’s be honest, you don’t.
- What if the skin is burning before the inside is cooked? Oh no! If that happens, you might need to slightly lower the temperature (e.g., to 350°F / 175°C) and cook for a bit longer, or loosely tent the chicken with foil for the last part of cooking.
- Can I make gravy with the drippings? You bet! The drippings in the bottom of your air fryer can be deglazed with a splash of broth or wine, thickened with a cornstarch slurry, and seasoned for a quick, flavorful gravy. Waste not, want not!
- What size chicken works best? Generally, a 2-3 lb (1-1.5 kg) chicken is ideal for most standard air fryers. Anything larger might struggle to cook through or simply won’t fit.
Final Thoughts
There you have it, folks! Your new go-to, stress-free, incredibly delicious roast chicken recipe, courtesy of your trusty air fryer. Who knew something so simple could taste so good? Now go impress someone—or yourself—with your new culinary skills. You’ve earned it! Seriously, pat yourself on the back, grab a knife, and dig into that crispy, juicy goodness. You just owned dinner!


