So, You’re Dreaming of Takeout But Want to Pretend You Cooked? Same!
So you’re craving something ridiculously tasty, maybe a little sweet, a little savory, and definitely *not* from a delivery app, but you’re also about two steps away from just eating cereal for dinner, huh? Welcome to the club! We’ve all been there, staring blankly into the fridge, wishing a delicious, restaurant-quality meal would magically appear. Well, buckle up, buttercup, because I’m about to give you the next best thing: a baked Asian chicken recipe that’s so easy, you’ll wonder why you ever paid for takeout. Seriously, this bad boy is about to become your new weeknight hero.
Why This Recipe is Awesome (AKA: Why You’re About to Become a Culinary Legend)
Let’s be real, you’re busy. Your to-do list is longer than a CVS receipt, and “chef de cuisine” isn’t exactly high on your current job description. That’s where this recipe swoops in like a superhero in a very shiny, sticky glaze cape.
- First off, it’s **idiot-proof**. And I say that with the utmost love, because if *I* can make it without setting off the smoke detector, so can you.
- Secondly, the flavor profile? *Chef’s kiss*. It’s that perfect balance of sweet, salty, and a tiny bit tangy that makes your taste buds do a happy dance.
- Thirdly, minimal effort, maximum deliciousness. You basically mix, slather, and bake. The oven does 90% of the work. You get all the credit. It’s a win-win, IMO.
- And finally, cleanup is surprisingly manageable, especially if you’re smart and **line your baking sheet**. (More on that genius move later.)
Ingredients You’ll Need (aka: The Goods)
Gather ’round, my fellow lazy gourmands! Here’s what you’ll need to transform some humble chicken into a feast. Don’t worry, most of these are pantry staples, or easily found at your local grocery store. No exotic foraging required!
- Chicken Thighs (6-8 pieces, bone-in, skin-on): Because dark meat is juicier, and crispy skin is life. Trust me on this. Boneless, skinless works too, but you’ll miss out on some magic.
- Soy Sauce (1/2 cup): The backbone of our Asian-inspired flavor. Use low-sodium if you’re watching your salt intake, or just regular if you live dangerously.
- Honey or Maple Syrup (1/4 cup): For that glorious, sticky sweetness and beautiful caramelization. You pick your poison!
- Rice Vinegar (2 tablespoons): Adds a crucial tangy kick that cuts through the richness. Don’t skip it!
- Fresh Ginger (1 tablespoon, grated): Fresh is best, seriously. But if you’re really in a pinch, that squeeze tube ginger in the produce aisle will do. Just don’t tell anyone I said that.
- Garlic (4 cloves, minced): Because garlic makes everything better. It’s a fact. No arguments.
- Sesame Oil (1 teaspoon): A little goes a long way, but it adds that unmistakable nutty, aromatic depth. Don’t overdo it, or it’ll taste like a sesame seed bomb exploded in your mouth.
- Red Pepper Flakes (1/2 teaspoon, optional): For a little bit of *zing* if you like things spicy. Add more if you’re feeling extra feisty!
- Salt & Black Pepper: To taste, because even superstars need a little seasoning.
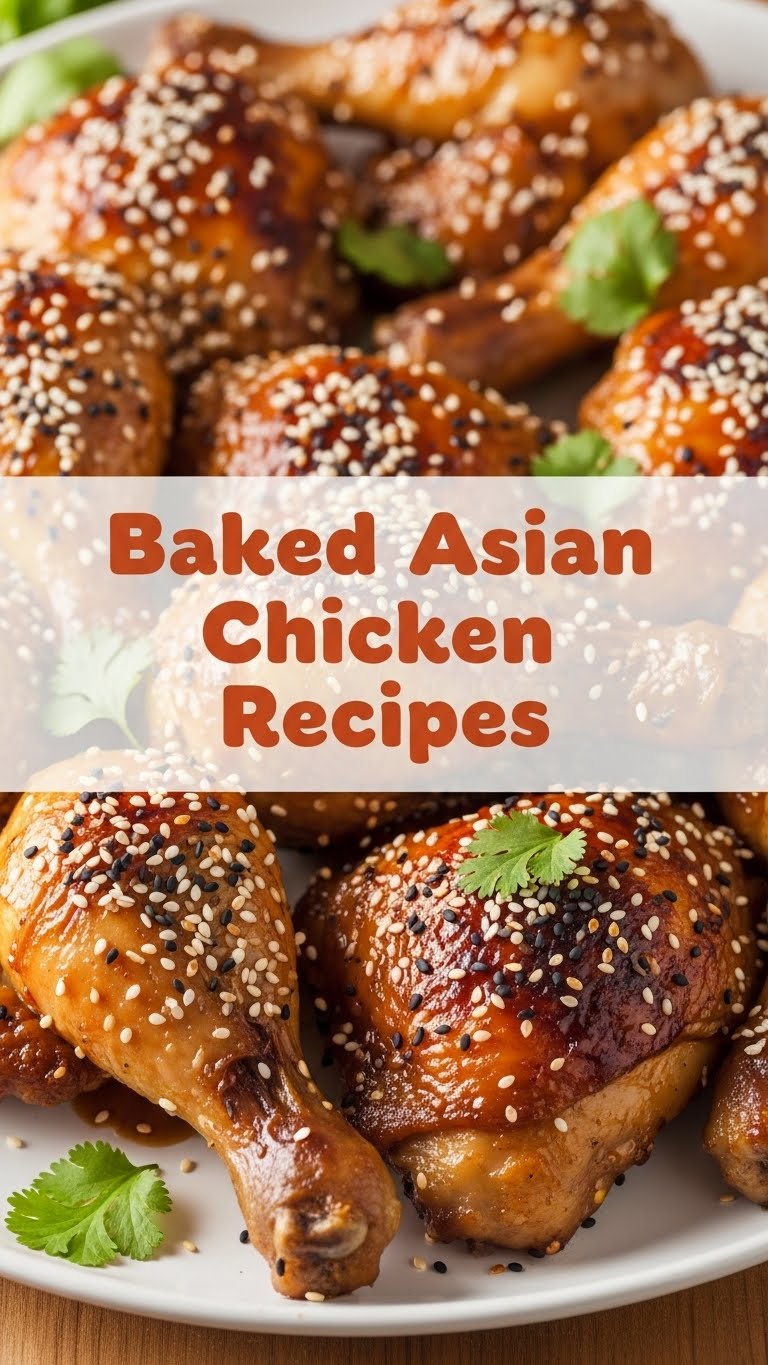
- For Garnish (optional but highly recommended): Sliced green onions and a sprinkle of sesame seeds. Makes it look like you actually tried.
Step-by-Step Instructions (Even I Can Do It Edition)
Alright, sleeves up (or don’t, it’s not that messy). Let’s make some magic!
- Preheat & Prep: First things first, crank that oven up to **400°F (200°C)**. While it’s heating, grab a baking sheet and, for the love of all that is holy, **line it with parchment paper or foil**. Your future self will thank you when it’s time to clean up.
- Chicken TLC: Pat your chicken thighs dry with paper towels. Seriously, this step is important! It helps the skin get super crispy and allows that gorgeous sauce to stick. Arrange them on your lined baking sheet.
- Whisk Up the Magic Sauce: In a medium bowl, combine the soy sauce, honey (or maple syrup), rice vinegar, grated ginger, minced garlic, sesame oil, red pepper flakes (if using), and a pinch of salt and pepper. Whisk it all together like you’re conducting a tiny orchestra of deliciousness.
- The Glazing Begins: Pour about half of your glorious sauce over the chicken thighs. Make sure to get it all over, like you’re giving them a delicious spa treatment. You can let them marinate for 15-30 minutes if you have time, or just pop ’em straight into the oven if hanger strikes.
- Bake It ‘Til Golden: Slide that baking sheet into your preheated oven. Bake for **35-40 minutes**.
- Baste & Conquer: Around the 20-minute mark, pull the chicken out and baste it generously with the remaining sauce. This is where the magic really happens, building up that beautiful, sticky glaze. Return to the oven.
- Crispy Perfection: For the last 5-10 minutes, if your chicken isn’t as crispy as you’d like, you can crank up the heat to **425°F (220°C)** or even hit the broiler for a minute or two (watch it like a hawk though, things burn fast!). The internal temperature should reach **165°F (74°C)**.
- Serve & Devour: Let the chicken rest for a few minutes before garnishing with sliced green onions and sesame seeds. Serve hot with some fluffy rice or stir-fried veggies. Congrats, you just made dinner!
Common Mistakes to Avoid (So You Don’t Cry Over Burnt Dinner)
Even the simplest recipes have traps for the unwary. Fear not, I’m here to illuminate the path!
- Forgetting to Pat the Chicken Dry: This is probably the number one offender. Wet chicken = steamed chicken = no crispy skin. Don’t be that person.
- Overcrowding the Pan: Give those chicken thighs some personal space! If they’re too close, they’ll steam instead of roast, leading to sad, pale chicken. Use two baking sheets if you need to.
- Skipping the Basting: The basting step isn’t just for show; it’s essential for building that incredible, sticky, caramelized glaze. Don’t be lazy here!
- Not Lining Your Baking Sheet: You’ll regret this. Trust me. That sticky glaze *will* glue itself to your pan, and you’ll spend an hour scrubbing. Parchment paper is your BFF.
- Using Cold Chicken Straight from the Fridge: Let your chicken sit out for 15-20 minutes before baking to bring it closer to room temp. It’ll cook more evenly this way.
Alternatives & Substitutions (Because We’re All About That Flexibility)
Life happens, and sometimes you don’t have exactly what the recipe calls for. No stress!
- Chicken Parts: Only got boneless, skinless breasts? Go for it! Just reduce the cooking time by about 10-15 minutes and keep an eye on the internal temp so they don’t dry out. Wings also work beautifully, just adjust cooking time accordingly.
- Sweetener Swap: Out of honey? Brown sugar, agave, or even a good quality maple syrup will work just fine for that sweet sticky factor.
- Vinegar Vibes: No rice vinegar? Apple cider vinegar or even white wine vinegar can step in, though the flavor will be slightly different.
- Spice It Up: Don’t have red pepper flakes? A squirt of Sriracha or a dash of your favorite hot sauce will do the trick.
- Veggie Boost: Want a one-pan wonder? Toss some broccoli florets, bell pepper strips, or chopped carrots with a little olive oil, salt, and pepper, and roast them alongside the chicken during the last 15-20 minutes.
FAQ (Frequently Asked & Funnily Answered Questions)
Got questions? I’ve got answers, probably with a side of sass.
- Can I use frozen chicken? Well, technically yes, but please **thaw it completely first**! Trying to bake a frozen block of chicken will lead to uneven cooking and a very long wait. Don’t do it.
- How long can I marinate the chicken? You can definitely let it hang out in the fridge with the sauce for at least 30 minutes, or even **overnight for deeper flavor**. Just don’t go past 24 hours, or the acid in the marinade can start to break down the chicken too much.
- Is this recipe spicy? It’s as spicy as you make it! The 1/2 teaspoon of red pepper flakes gives a mild kick. If you’re a heat fiend, go wild! If you’re sensitive, omit them completely.
- What should I serve with this delicious chicken? Fluffy white rice is a classic, obviously. But it also pairs wonderfully with brown rice, quinoa, rice noodles, or a simple side salad to balance the richness.
- Can I make this ahead of time? You can absolutely **make the sauce ahead of time** and keep it in the fridge for a few days. As for baking the chicken, it’s best fresh, but leftovers are still pretty darn good for lunch the next day!
- Is this recipe gluten-free? Not automatically! You’ll need to use **Tamari (gluten-free soy sauce)** instead of regular soy sauce to make it GF-friendly.
- I don’t have an oven, can I still make this? You *could* try it in an air fryer (adjusting temps and times, of course) or even pan-fry the chicken after marinating, then simmer it in the sauce. But for that true “baked” sticky goodness, an oven is your best bet.
Final Thoughts (Now Go Forth & Conquer!)
See? Told you it was easy peasy, lemon squeezy (or in this case, soy-ginger-honey-eezy?). You just created a dish that tastes like you spent hours slaving away, when in reality, you probably caught up on your favorite show while it baked.
So, what are you waiting for? Go impress someone—or more importantly, yourself—with your new culinary skills. You’ve earned it! Now go forth and bask in the glory of your perfectly baked Asian chicken. And maybe send me an invite if you make extra, just sayin’. 😉


