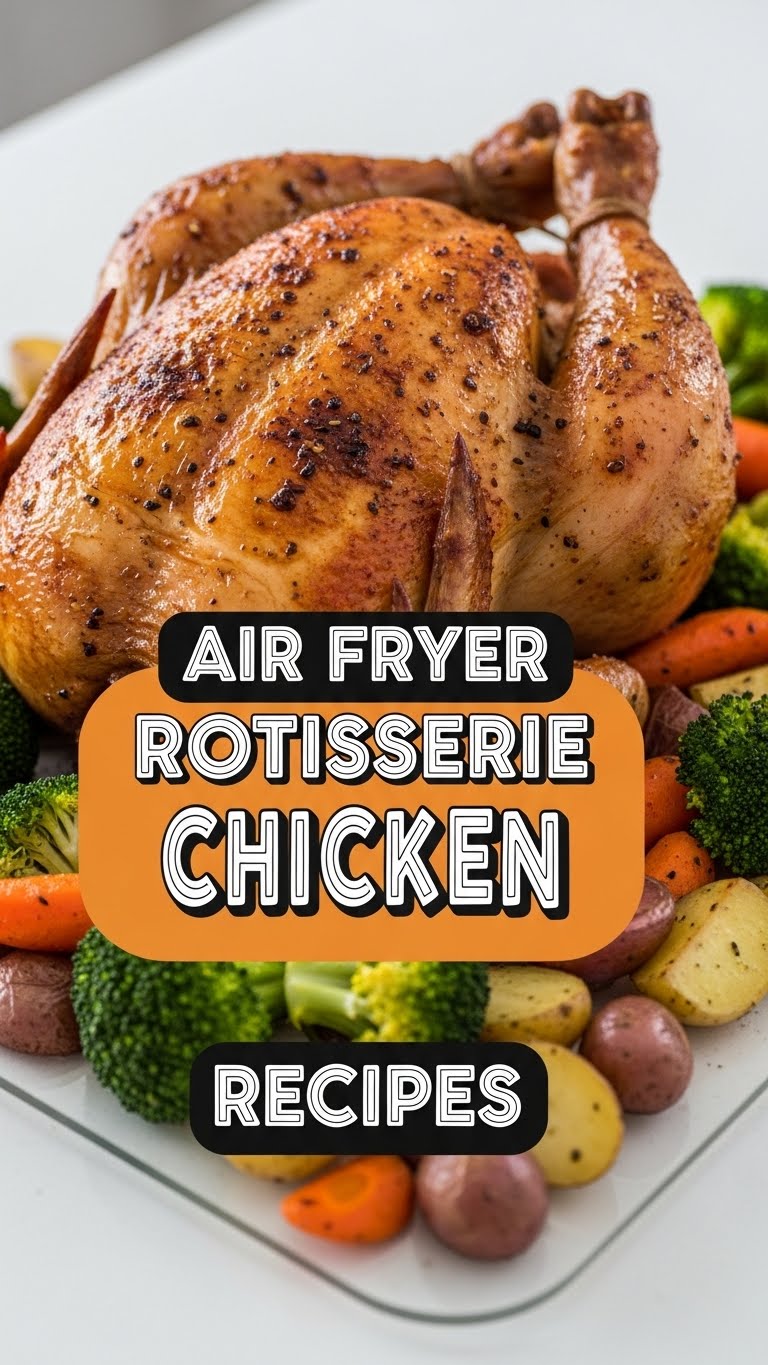
So you’re craving something ridiculously tasty but also feeling a bit, shall we say, *enthusiastic* about doing the bare minimum? High five, friend! You’ve landed in the right spot because today, we’re unleashing the magic of the air fryer to create a “rotisserie” chicken that’s so good, your local grocery store might get jealous. No fancy turning spit required unless your air fryer is that extra. Get ready to feel like a kitchen wizard without actually having to cast any complicated spells!
Why This Recipe is Awesome
Let’s be real, who doesn’t love a good rotisserie chicken? The crispy skin, the juicy meat, the way it just screams “I tried, but not *too* hard.” But buying one? That’s, like, a whole trip to the store. With this air fryer version, you get all the glory with about 10 minutes of actual effort. Seriously, it’s practically **idiot-proof**. Even I, who once set off a smoke alarm with toast, can nail this. Plus, your kitchen will smell like pure comfort, and your taste buds will thank you profusely. It’s a win-win-win. Oh, and it’s usually cheaper than buying one too. Just sayin’.
Ingredients You’ll Need
Gather ’round, fellow culinary minimalist! Here’s what you’ll need for your chicken masterpiece. Don’t worry, nothing obscure, promise.
- 1 Whole Chicken (3-4 lbs): This is our star. Make sure it’s defrosted and patted dry. Think of it like giving it a spa treatment before its big performance.
- 1-2 Tablespoons Olive Oil: Or avocado oil, or any oil you fancy. It’s the “lotion” that helps our chicken get that gorgeous tan.
- 1 Tablespoon Smoked Paprika: For that beautiful color and smoky depth. Don’t skip this, IMO, it’s a game-changer.
- 1 Teaspoon Garlic Powder: Because everything is better with garlic. Duh.
- 1 Teaspoon Onion Powder: Garlic’s best buddy, rounding out the flavor party.
- 1 Teaspoon Dried Thyme (or Rosemary): Adds that herbaceous, sophisticated touch. Or just use whatever dried herb looks lonely in your spice rack.
- 1 Teaspoon Salt: Crucial for flavor. Don’t be shy, but don’t overdo it either. It’s a balance!
- 1/2 Teaspoon Black Pepper: Freshly ground is best, but pre-ground works too if you’re keeping it casual.
- Optional: Lemon or Onion Halves: Stuff ’em in the cavity for extra moisture and subtle flavor. Your chicken will thank you.
Step-by-Step Instructions
Alright, apron on (or not, we don’t judge), let’s get this bird cooked!
- Prep Your Chicken: First things first, unwrap your chicken and **pat it super dry** with paper towels. Seriously, this is key for crispy skin! Remove any giblets from the cavity. If you’re using lemon or onion, stuff ’em in now.
- Oil It Up: Drizzle the olive oil all over the chicken. Use your hands (yes, get in there!) to rub it evenly over the entire surface, making sure to hit every nook and cranny.
- Season Like a Boss: In a small bowl, mix together the smoked paprika, garlic powder, onion powder, dried thyme, salt, and black pepper. Now, sprinkle this glorious spice blend all over your chicken, rubbing it in gently. Don’t forget the underside and the wings!
- Preheat Your Air Fryer: Set your air fryer to 375°F (190°C) and let it preheat for about 5 minutes. This is important for that initial crisp!
- Into the Fryer It Goes: Carefully place the seasoned chicken breast-side down in your air fryer basket. Make sure it fits without touching the sides too much. You might need to truss the legs with some kitchen twine if your chicken is feeling particularly sprawling.
- Cook and Flip: Cook for 30 minutes breast-side down. Then, flip the chicken breast-side up and continue cooking for another 30-45 minutes, or until a meat thermometer inserted into the thickest part of the thigh (without touching bone) reads **165°F (74°C)**.
- Rest, Then Revel: Once cooked, carefully remove the chicken from the air fryer and place it on a cutting board. **Tent it loosely with foil and let it rest for 10-15 minutes.** This step is non-negotiable for juicy meat, FYI.
- Carve and Devour: Carve that beautiful bird and serve it up! Prepare for applause.
Common Mistakes to Avoid
Nobody’s perfect, but we can avoid these common blunders that stand between you and air fryer chicken nirvana:
- Skipping the Pat Dry: Seriously, I cannot stress this enough. A wet chicken equals rubbery skin. Don’t do it!
- Forgetting to Preheat: Just like an oven, an air fryer needs to get up to temp. Cold start means less crispy and uneven cooking. **Preheat, people!**
- Overcrowding the Basket: Your chicken needs space to breathe (and crisp). If it’s too big for your air fryer, you’re better off cutting it up or finding another cooking method. Air flow is key!
- Not Resting the Chicken: Impatience is a virtue, but not here. Cutting into it too soon lets all those precious juices escape, leaving you with dry meat. Give it a moment to chill.
- Eyeballing Doneness: Unless you have superhero x-ray vision, a meat thermometer is your best friend. Don’t guess; **cook to temperature** for safety and perfection.
Alternatives & Substitutions
Feeling creative? Here are some ways to shake things up:
- Spice Rubs: Not feeling my blend? Go wild! Try a lemon-herb mix, a spicy Cajun rub, or even a simple rosemary and garlic. The world is your oyster… or, well, your chicken!
- Herb Power: Fresh herbs tucked under the skin (like rosemary or thyme) can infuse incredible flavor. Just be careful they don’t burn if they’re exposed too much.
- Butter or Mayo Instead of Oil: Some folks swear by rubbing butter or even a thin layer of mayonnaise (don’t knock it till you try it!) on the chicken for extra browning and flavor. YOLO, give it a shot!
- Brining for Super Juiciness: If you’ve got time (like, overnight time), a simple saltwater brine can make your chicken ridiculously juicy. It’s an extra step, but totally worth it if you’re feeling ambitious.
FAQ (Frequently Asked Questions)
Got questions? I’ve got (mostly sarcastic) answers!
- “My chicken is smoking! What do I do?”
Deep breaths! A little smoke is normal, especially with fatty chicken. If it’s excessive, check for grease buildup or a too-hot air fryer. Maybe turn down the temp slightly or add a slice of bread under the basket to absorb drips.
- “Can I use a larger chicken?”
Well, how big is your air fryer? If it fits and leaves some room for air circulation, go for it! Just remember to adjust cooking time accordingly. A bigger bird needs more time, obviously.
- “How do I get super crispy skin?”
Patting dry is number one. You can also finish it off with a blast of higher heat (like 400°F/200°C) for the last 5-10 minutes, keeping a close eye on it so it doesn’t burn. **Crispy skin is life!**
- “Can I make this ahead of time?”
You can definitely prep the chicken (pat dry, season) a few hours before or even the night before and keep it in the fridge. Cooking right before eating is always best for maximum deliciousness, though.
- “What if I don’t have all those specific spices?”
Relax! Use what you have. A simple salt, pepper, and garlic powder combo works wonders. The goal is flavor, not a spice rack competition.
- “My chicken isn’t browning evenly, what gives?”
Air fryers have hot spots. Try rotating your chicken half-way through the cooking process. Also, ensure it’s not crammed in there.
Final Thoughts
There you have it, folks! Your very own air fryer rotisserie chicken that will make you question why you ever bought one from the store. It’s easy, delicious, and makes your kitchen smell like a five-star restaurant (without the fancy bill). Now go impress someone—or yourself—with your new culinary skills. You’ve earned it!
Happy cooking, and remember: life’s too short for bland chicken!


