So, you’ve stared into the abyss of your fridge one too many times, wishing a delicious, healthy meal would just *poof* into existence? And the thought of cooking dinner every single night this week makes you want to crawl under a blanket with a tub of ice cream? Yeah, I’ve been there. My friend, it’s time to unleash the magic of **baked chicken meal prep**! Get ready to save your sanity, your wallet, and your precious couch time.
Why This Recipe is Awesome
Let’s be real: who has time to cook a gourmet meal after a long day of, well, existing? Not me, and probably not you. This baked chicken meal prep isn’t just a recipe; it’s a lifestyle hack. It’s so simple, even my cat could probably supervise it (and she mostly just judges me). You get flavorful, tender chicken ready for salads, wraps, or just alongside some veggies, all prepped in one glorious batch. Plus, your future self will practically send you a thank-you note from the couch.
Think about it: less takeout, more money in your pocket, and actual control over what you’re shoveling into your face. It’s truly a win-win-win situation. And did I mention it’s almost impossible to mess up? Seriously, it’s idiot-proof. Even I didn’t set off the smoke detector this time!
Ingredients You’ll Need
Gather your gladiators, err, ingredients! Most of these are probably already lurking in your pantry, waiting for their moment in the spotlight. Or maybe they’re on sale this week – score!
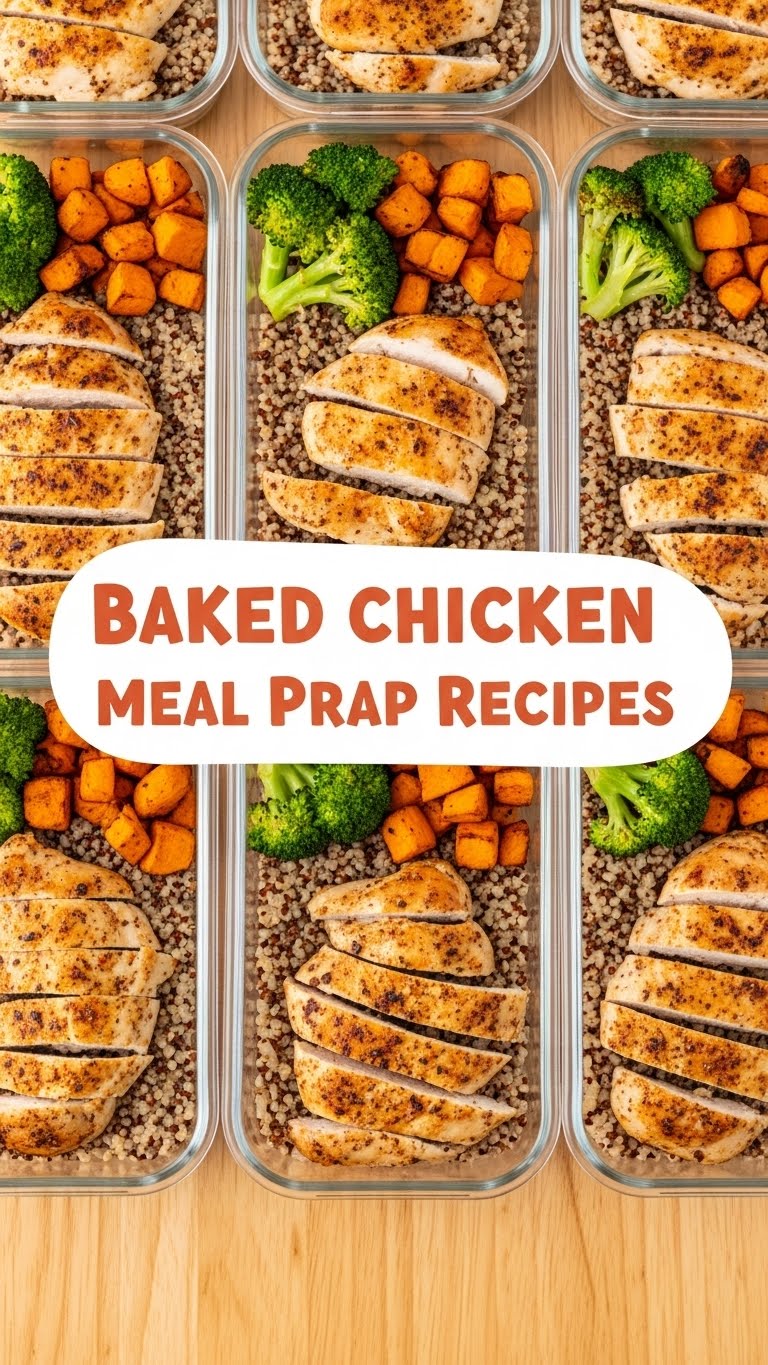
- Chicken Breasts or Thighs (1.5-2 lbs): Boneless, skinless, please. Unless you enjoy a crispy skin, then go wild!
- Olive Oil (2-3 tbsp): Your chicken’s best friend. Helps it get all golden and lovely.
- Salt & Black Pepper: The OG seasoning duo. Don’t skip these, unless you want bland chicken. (You don’t).
- Garlic Powder (1 tsp): Because garlic makes everything better. It’s a scientific fact.
- Onion Powder (1 tsp): Garlic’s quieter, equally essential sibling.
- Paprika (1 tsp): For a little color and smoky depth. Unless you hate fun, then leave it out. (Just kidding, mostly).
- Dried Herbs (1 tsp total): Think Italian seasoning, oregano, thyme, or rosemary. Pick your poison!
- Optional Veggies (2-3 cups): Broccoli florets, bell peppers (any color!), zucchini, cherry tomatoes, or chopped sweet potatoes. The more colors, the better for your Instagram feed… and your health!
Step-by-Step Instructions
Alright, apron on, “pump-up” playlist ready, let’s do this! It’s so easy, you’ll wonder why you haven’t done this every week.
- Preheat & Prep: Get that oven nice and toasty! Preheat your oven to 400°F (200°C). Line a large baking sheet with parchment paper for super easy cleanup. Nobody likes scrubbing crusty baking sheets, am I right?
- Chicken Time: Pat your chicken pieces dry with paper towels. This helps them get a better sear and avoids sad, steamy chicken. Place them on your prepared baking sheet.
- Season It Up: Drizzle the olive oil over the chicken. Sprinkle generously with salt, pepper, garlic powder, onion powder, paprika, and your chosen dried herbs. Now, get in there with your hands and massage that seasoning in! Make sure every piece is coated like it’s getting ready for a spa day.
- Veggie Fiesta (Optional but Recommended): If you’re adding veggies, toss them in a separate bowl with a tiny bit more olive oil, salt, and pepper. Arrange them on the baking sheet around the chicken. Don’t overcrowd the pan, or things will steam instead of roast! Use two sheets if needed.
- Bake It ‘Til Golden: Slide that sheet into the oven. Bake for 20-30 minutes, depending on the thickness of your chicken and if you’re baking with veggies. You’re looking for an internal temperature of 165°F (74°C) for chicken breasts, or until the juices run clear and the outside is nicely golden.
- Rest & Devour (or Prep!): Once cooked, remove the chicken from the oven. Let it rest for 5-10 minutes before slicing or dicing. This keeps the chicken juicy – a crucial step! Divide your masterpiece into airtight containers for the week ahead.
Common Mistakes to Avoid
Even though this recipe is practically foolproof, there are a few rookie errors that can derail your delicious journey. Learn from my mistakes, folks!
- Forgetting to Preheat the Oven: Rookie move! Your chicken won’t cook evenly, and you’ll end up with rubbery chicken. Just preheat, it takes like 10 minutes.
- Overcrowding the Pan: I know, you want to cook everything at once. But cramming too much onto one sheet means things steam rather than roast, leaving you with soggy chicken and sad veggies. Give everything space!
- Skipping the Rest: Don’t be impatient! Letting the chicken rest for a few minutes allows the juices to redistribute, resulting in much juicier meat. Cut it too soon, and all those precious juices will end up on your cutting board, not in your mouth.
- Not Drying the Chicken: Wet chicken means less browning and a less appealing texture. A quick pat-down with paper towels makes a huge difference.
Alternatives & Substitutions
Feeling a little rebellious? Want to mix things up? Go for it! This recipe is super flexible, which is part of its charm. Think of it as a canvas for your culinary creativity.
- Spice Swaps: Not a fan of paprika? Try chili powder for a kick, or a pinch of cumin for an earthy flavor. Want something zesty? Add a squeeze of lemon juice or a dash of lemon pepper!
- Veggie Variety: The world is your oyster! Asparagus, Brussels sprouts, carrots, even potatoes (chop smaller and add earlier for even cooking). Whatever’s seasonal or on sale, honestly.
- Chicken Cuts: Chicken tenderloins cook faster, making this an even quicker meal. Just adjust baking time down to about 15-20 minutes. Dark meat chicken thighs tend to stay juicier, if that’s your jam.
- Marinades: For extra flavor, marinate the chicken for at least 30 minutes (or overnight!) in Italian dressing, a simple lemon-herb marinade, or even a splash of soy sauce and ginger for an Asian twist.
FAQ (Frequently Asked Questions)
Got questions? I’ve got answers! (Mostly.)
- How long does this chicken last in the fridge? Glad you asked! Properly stored in airtight containers, your glorious meal prep chicken will last 3-4 days. Perfect for a work week!
- Can I freeze the cooked chicken? Absolutely! Once cooled, slice or dice the chicken, then freeze in a single layer on a baking sheet before transferring to a freezer-safe bag or container. It’ll be good for up to 3 months. Just thaw overnight in the fridge when you’re ready.
- What’s the best way to reheat it? A quick zap in the microwave usually does the trick for individual portions. For larger batches or if you want to avoid rubbery chicken, a few minutes in a skillet on medium heat or a short stint in the oven (covered with foil to prevent drying) works wonders.
- My chicken is dry! What went wrong? Oh no! Most likely, it was overcooked. Always use a meat thermometer to check for 165°F. Also, remember to rest your chicken after baking!
- Can I use bone-in chicken? Sure, but you’ll need to adjust the cooking time significantly, likely adding another 15-25 minutes, depending on the cut. Bone-in takes longer, FYI!
- Do I really need parchment paper? Technically, no. But do you really want to spend extra time scraping baked-on chicken gunk? Parchment paper is your friend! Trust me, your future self will thank you.
Final Thoughts
So there you have it! Your new go-to, stress-free, totally delicious baked chicken meal prep recipe. No more sad desk lunches, no more frantic “what’s for dinner?” moments. Just flavorful, juicy chicken ready to be devoured whenever hunger strikes. Now go impress someone—or yourself—with your new culinary skills. You’ve earned it!
Happy prepping, friend!


