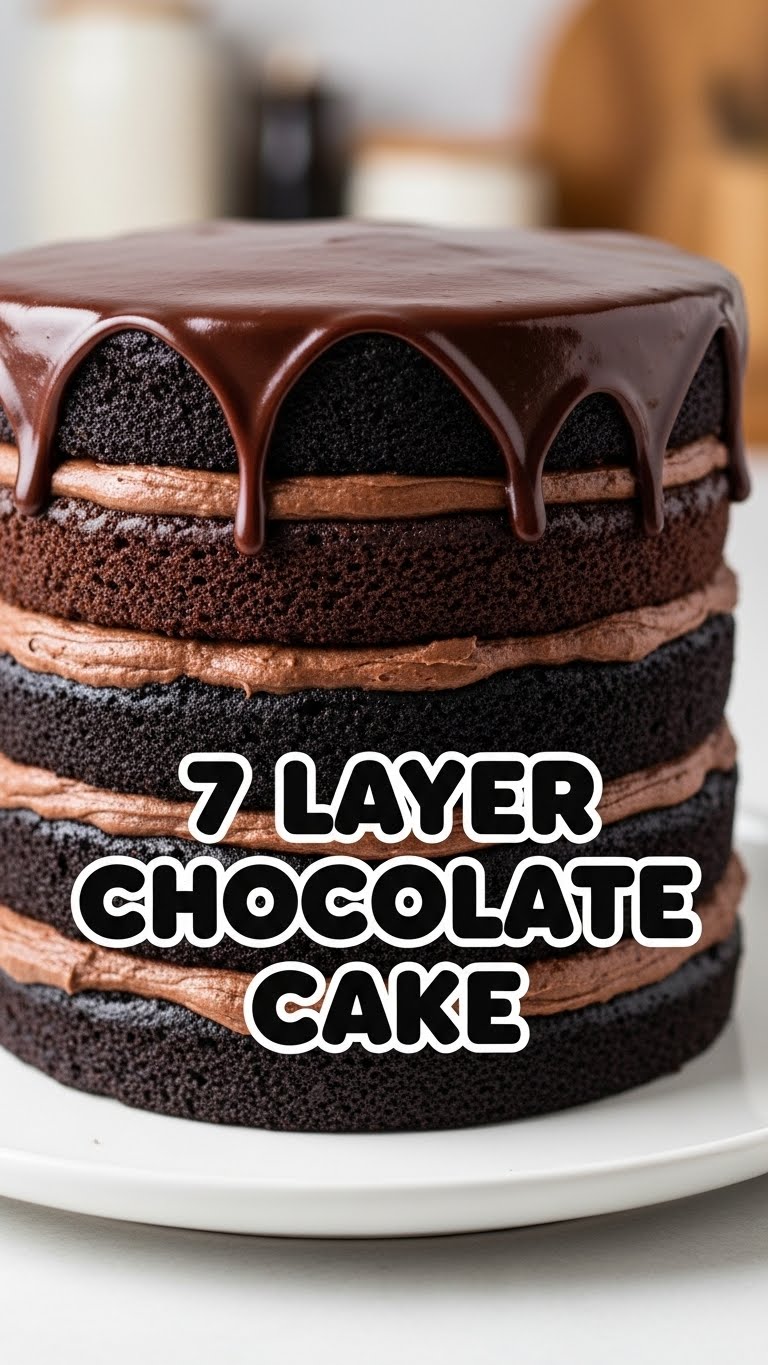
So, you’re telling me you love chocolate, but you also love a challenge? Or maybe you just love looking like you took on a challenge, even if the recipe is secretly a breeze? 😉 Excellent! Because today, my friend, we’re diving headfirst into the glorious, multi-tiered world of the 7 Layer Chocolate Cake. And trust me, it’s not as intimidating as it sounds. We’re talking chocolate on chocolate on chocolate, times seven. Prepare for a serious sugar rush and a whole lot of “oohs” and “aahs” from your adoring public!
Why This Recipe is Awesome
Okay, first things first: This isn’t just a chocolate cake. This is the chocolate cake. Why is it awesome? Let’s count the ways:
- It looks wildly impressive, like you spent a weekend in culinary school. (Spoiler alert: you didn’t. You probably just watched Netflix and baked this in between episodes.)
- It’s surprisingly forgiving. Seriously, if I can do it without a major kitchen fire, so can you. It’s practically idiot-proof!
- Seven layers! Think of the texture! Think of the chocolate delivery system! Each bite is a journey through fudgy goodness.
- It’s a fantastic way to win friends, influence people, or just treat yo’ self. No judgment here.
Ingredients You’ll Need
Alright, gather your chocolatey arsenal! You’ll need the usual suspects, maybe a few extra cocoa packets, but nothing too wild.
- All-Purpose Flour: The backbone of our cakey masterpiece. Don’t skimp, unless you’re going gluten-free (more on that later!).
- Granulated Sugar: Sweetness, because life’s too short for unsweet cakes.
- Unsweetened Cocoa Powder: The star of the show! Use good quality stuff. Seriously, your taste buds will thank you.
- Baking Soda & Baking Powder: Our leavening dynamic duo. They make magic happen.
- Salt: Just a pinch, to make all that chocolate sing!
- Eggs: Room temp, please! They mix better.
- Milk: Whole milk works best for richness, but whatever you have will probably do.
- Vegetable Oil: Or canola oil. Keeps the cake moist and tender.
- Vanilla Extract: A secret weapon, even in chocolate cakes. It enhances the chocolate flavor!
- Hot Water (or Coffee): This is key! It blooms the cocoa for ultimate flavor. And yes, coffee makes chocolate taste more like chocolate. Trust me on this.
For the Best Chocolate Frosting Ever:
- Unsalted Butter: Room temperature is non-negotiable for smooth frosting.
- Powdered Sugar (Confectioners’ Sugar): Sifted, or you’ll have lumpy frosting. And nobody wants lumpy frosting.
- Unsweetened Cocoa Powder: Again, good quality, please!
- Heavy Cream: For that luscious, creamy texture. A little goes a long way.
- Vanilla Extract: More vanilla, more flavor!
Step-by-Step Instructions
Ready to bake some magic? Let’s get this party started!
- Prep Your Pans & Oven: First things first, preheat your oven to 350°F (175°C). Grease and flour *three* 8-inch round cake pans. You’ll bake in batches, because who has seven cake pans? Not me. Line the bottoms with parchment paper if you’re feeling extra fancy (and smart!).
- Whisk Dry Ingredients: In a large bowl, whisk together the flour, sugar, cocoa powder, baking soda, baking powder, and salt. Make sure there are no lumpy bits!
- Mix Wet Ingredients: In a separate medium bowl, whisk together the eggs, milk, oil, and vanilla extract until well combined.
- Combine & Conquer: Gradually add the wet ingredients to the dry ingredients, mixing on low speed with an electric mixer (or by hand, if you’re feeling buff) until *just* combined. Do not overmix! A few lumps are okay.
- Add the Hot Stuff: Slowly pour in the hot water (or coffee) and mix on low until the batter is smooth. It will be thin – don’t panic, that’s normal. This is where the magic happens!
- Bake the Layers: Divide the batter evenly among your three prepared pans. Bake for 25-30 minutes, or until a wooden skewer inserted into the center comes out clean.
- Cool Down: Let the cakes cool in the pans for 10-15 minutes before inverting them onto a wire rack to cool completely. Crucial step: fully cool them before frosting! Repeat steps 6 & 7 with the remaining batter, potentially making 2-3 more batches depending on how thin you want your layers (aim for 7 total layers, so each cake will be sliced into thinner layers).
- Make the Frosting: While your cakes are cooling, beat the softened butter in a large bowl with an electric mixer until creamy. Gradually add the sifted powdered sugar and cocoa powder, alternating with splashes of heavy cream and vanilla, until smooth and fluffy. If it’s too thick, add more cream; too thin, more sugar.
- Assemble Your Masterpiece: Once all layers are baked and *completely* cool (seriously, this is important!), use a serrated knife to carefully level any domes and slice each cake horizontally into thinner layers (you’ll likely get 2-3 layers per baked cake, aiming for 7 total). Place one cake layer on your serving plate or cake stand. Spread a generous layer of frosting on top. Repeat with the remaining layers, stacking them high.
- The Grand Finale: Frost the sides and top of the entire cake. You can make it smooth, rustic, or even add some chocolate shavings for extra flair. Stand back and admire your handiwork!
Common Mistakes to Avoid
Listen, we’ve all been there. Baking can be a minefield of ‘oops’ moments. Here are some classic blunders to dodge:
- Overmixing the Batter: This is probably the number one rookie mistake. Overmixing develops the gluten, making your cake tough and dense. Mix until *just* combined. A few lumps are a sign you did it right!
- Not Letting Cakes Cool Completely: Attempting to frost a warm cake is like trying to ice a melting snowman. It will slide, it will weep, it will make you want to throw things. Patience, grasshopper.
- Not Sifting Powdered Sugar: Unless you enjoy discovering mysterious powdered sugar lumps in your otherwise smooth frosting, grab that sieve. You’ll thank yourself.
- Eyeballing Ingredients: Baking is a science, not an art, at least when it comes to measurements. Use proper measuring cups and spoons. Don’t be a hero.
- Opening the Oven Door Too Early: You know that irresistible urge to peek? Resist it for the first 20 minutes! Let those cakes rise in peace, otherwise they might collapse.
Alternatives & Substitutions
Feeling rebellious? Want to tweak things a bit? I got you.
- Gluten-Free Fun: Swap out the all-purpose flour for a good quality 1:1 gluten-free baking blend. Easy peasy!
- Dairy-Free Delight: Use your favorite non-dairy milk (almond, oat, soy) and a plant-based butter substitute for the frosting. Coconut cream can also make a surprisingly rich frosting.
- Less Layers, Still Awesome: Look, if seven layers feels like too much commitment, make it a 4-layer cake! It’ll still be epic. Or just make three thick layers and call it a day. It’s *your* cake.
- Frosting Fling: Not feeling pure chocolate frosting? Try a chocolate ganache drip, add some raspberry preserves between layers, or even a different flavor of buttercream (peanut butter chocolate? Mint chocolate? The possibilities are endless!).
- Add-Ins: Chocolate chips in the batter? A sprinkle of sea salt on top of the frosting? Some chopped nuts? Go wild, my friend.
FAQ (Frequently Asked Questions)
Still got questions swirling in your chocolate-filled brain? Let’s tackle ’em!
- Can I make this cake ahead of time? Absolutely! You can bake the cake layers a day or two in advance, wrap them tightly in plastic wrap, and store them at room temp. Frosting can also be made a day ahead and refrigerated, then re-whipped before use. Pro tip: Freeze the layers for easier slicing!
- How do I store a 7-layer cake? In an airtight container at room temperature for up to 3 days, or in the fridge for up to 5 days. Just make sure it’s covered so it doesn’t dry out. Or, you know, just eat it all. 😉
- What if my frosting is too thick/thin? Too thick? Add a tablespoon of heavy cream at a time until it reaches desired consistency. Too thin? Add more sifted powdered sugar, a tablespoon at a time. It’s a delicate dance!
- Do I really need seven layers? Can’t I just do three? Well, technically yes, but why deprive yourself of ultimate chocolate stack-power? The ‘seven’ is part of the charm! But really, make it as many layers as you want. It’ll still be delicious.
- My cake stuck to the pan! What went wrong? Rookie mistake! You likely didn’t grease and flour (or parchment line) your pans thoroughly enough. Next time, be generous! Also, ensure you cool them for *at least* 10-15 minutes in the pan before inverting.
- Can I use boxed cake mix for the layers? *Sigh.* While I won’t judge your shortcut, this recipe is designed to taste homemade and amazing. But if you’re in a real pinch and want to upgrade a box mix, go for it! Just make sure you still make this awesome homemade frosting. That’s non-negotiable!
Final Thoughts
Phew! You made it. You’ve conquered the mighty 7 Layer Chocolate Cake! Or, at least, you’re now armed with the knowledge to do so. This cake isn’t just dessert; it’s an experience. It’s a statement. It says, “I love chocolate, and I’m not afraid to show it!” So go forth, my friend, unleash your inner baker, and enjoy every single fudgy, glorious bite. Now go impress someone—or yourself—with your new culinary skills. You’ve earned it! Seriously, you’re a rockstar!

