
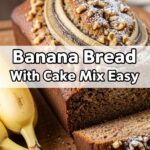
So you’re craving something warm, sweet, and comforting, but the thought of spending an hour on a recipe makes you want to crawl back into bed? Same, friend. Same. Welcome to the lazy-gourmet club, where we believe deliciousness shouldn’t require a culinary degree or an army of kitchen gadgets. Today, we’re diving headfirst into the glorious world of **4-Ingredient Banana Bread**. That’s right, *four*. You heard me!
Why This Recipe is Awesome
Let’s be real, adulting is hard enough without complicated recipes judging you from the cookbook. This banana bread? It’s your culinary cheat code. It’s so ridiculously simple, it practically bakes itself. No fancy mixers, no obscure ingredients you have to hunt down in the deepest corners of the supermarket. It’s **idiot-proof** – and I say that with love, having messed up my fair share of “easy” recipes. You get maximum cozy vibes for minimal effort. Plus, fewer ingredients mean less cleanup. Your future self will thank you, I promise.
Ingredients You’ll Need
Prepare for the shortest grocery list of your life. These are the humble heroes ready to transform into pure magic.
- 3-4 Overripe Bananas: The spottier, the better! We’re talking brown, mushy, “I should have thrown these out yesterday” bananas. They’re the real MVP for natural sweetness.
- 1 ½ cups Self-Rising Flour: This is your secret weapon. It’s already got the leavening agent mixed in, so no need for separate baking powder or soda. Genius, right?
- ½ cup Granulated Sugar: For that perfect balance of sweetness. If your bananas are super, *super* ripe, you might even get away with a little less. Your call, sweet tooth!
- ¼ cup Melted Unsalted Butter: The rich, creamy goodness that brings it all together.
Step-by-Step Instructions
Alright, apron on (or not, we’re not judging), let’s get this delicious show on the road!
- Preheat & Prep: First things first, turn your oven to **350°F (175°C)**. While it’s heating up, grab a loaf pan (9×5 inches works perfectly) and grease it. A little butter or non-stick spray goes a long way here!
- Mash ‘Em Up: In a medium bowl, peel those gloriously overripe bananas. Using a fork, mash them until they’re mostly smooth with a few small lumps. We’re not going for baby food, just a nice chunky consistency.
- Mix the Wet Stuff: Add the melted butter and granulated sugar to your mashed bananas. Stir them together until everything is well combined and looks wonderfully gooey.
- Fold in the Flour: Now, gently fold in the self-rising flour. Stir just until there are no dry streaks left. **Don’t overmix!** Overmixing develops the gluten too much, and we want tender banana bread, not a rubbery brick.
- Bake Away: Pour the batter into your prepared loaf pan. Pop it into the preheated oven and bake for about **45-60 minutes**.
- Check & Cool: You’ll know it’s done when a toothpick inserted into the center comes out clean or with just a few moist crumbs. Let it cool in the pan for about 10-15 minutes before carefully transferring it to a wire rack to cool completely. Or, if you’re impatient like me, slice it warm. YOLO.
Common Mistakes to Avoid
Even though this recipe is practically foolproof, there are a few banana bread blunders to steer clear of if you want perfection (or something close to it!).
- Using Under-Ripe Bananas: This is probably the biggest rookie mistake. Green or yellow bananas just don’t have the sweetness or the moisture we need. Wait for those brown spots! It’s worth it, trust me.
- Overmixing the Batter: I know, I know, it’s tempting to keep stirring. But resist! A few lumps are totally fine. Overmixing leads to tough, dense bread, and nobody wants that.
- **Forgetting to Grease the Pan:** Thinking you can skip this step? Oh, honey, no. Unless you enjoy prying chunks of delicious banana bread from the bottom of your pan, grease it. Liberally.
- Impatience is NOT a Virtue Here: Taking it out of the oven too early means a gooey, undercooked center. Give it its full time, and always do the toothpick test!
Alternatives & Substitutions
Feeling a little adventurous, or just missing an ingredient? I got you!
- No Self-Rising Flour? No Problem! You can totally make your own. For every cup of all-purpose flour, just add 1 ½ teaspoons of baking powder and ¼ teaspoon of salt. So for this recipe, you’d use 1 ½ cups all-purpose flour, 2 ¼ teaspoons baking powder, and about ⅜ teaspoon salt. Boom!
- Butter Swaps: While butter gives the best flavor IMO, you can technically use ¼ cup of neutral oil (like vegetable or canola) if you’re out of butter. Just know the flavor will be slightly different.
- Less Sugar: If your bananas are practically black with ripeness, they’ll be super sweet. You can reduce the sugar to ¼ cup or even less if you prefer. Taste the batter (before adding flour if you want to be super safe) and adjust!
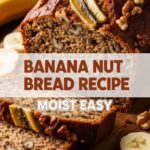
- Add-Ins (Shhh, a 5th Ingredient!): Okay, so it won’t be “4 ingredients” anymore, but if you want to jazz it up, feel free to fold in ½ cup of chocolate chips, chopped nuts (walnuts or pecans are great), or even a sprinkle of cinnamon with the flour.
FAQ (Frequently Asked Questions)
- Can I use margarine instead of butter? Well, technically yes, but why hurt your soul like that? Butter just tastes better. But in a pinch, margarine will do.
- My bananas aren’t super ripe, will it still work? It’ll work, but the flavor won’t be as intense and the bread might be a little less sweet and moist. For best results, really wait for those spots!
- Can I make muffins instead of a loaf? Absolutely! Just grease a muffin tin and fill the cups about two-thirds full. Bake for about 20-25 minutes, or until a toothpick comes out clean. Easy peasy!
- How long does this banana bread last? If it even *makes* it past day one (doubtful!), it’ll stay fresh for about 3-4 days at room temperature, tightly covered. You can also refrigerate it for up to a week.
- Can I freeze this banana bread? You betcha! Once completely cooled, wrap the loaf (or individual slices) tightly in plastic wrap, then foil. It’ll keep in the freezer for up to 3 months. Just thaw at room temp when you’re ready for a treat.
- Is it *really* only 4 ingredients? For the core base of the bread, yes! No kidding. That’s the beauty of self-rising flour and ripe bananas.
Final Thoughts
See? I told you it was easy! You just whipped up a batch of delicious, homemade banana bread with minimal fuss. Your kitchen probably smells amazing right now, and you’ve earned every single bite. This isn’t just a recipe; it’s a testament to simple pleasures and smart cooking. Now go impress someone—or yourself—with your new culinary skills. You’ve earned it! Grab a slice, maybe a cup of coffee, and pat yourself on the back. You’re basically a baking rockstar. Enjoy!
